
Filtering and handling analyzer output using diagnostic configuration files (.pvsconfig)
- How to use configuration files in IDEs and other analysis tools
- General functionality of configuration files
- Adding entries to the configuration file
- Filtering the analyzer messages
- Excluding files from the analysis
- Excluding projects from the analysis
- Ignoring configuration files
- Isolating settings for directories
- Ignoring global configuration files
- Specifying the file analysis timeout for a project/solution/system
- Changing a certainty level of a diagnostic rule
- Changing the text of the analyzer messages
- Managing synchronization of suppress files
- Selecting the PVS-Studio version for analysis
- Configuration files prioritization
- Executing commands from the CustomBuild task before running the analysis
- Suppressing parsing errors
- Ignoring analysis settings from Settings.xml
- Using the solution directory as the SourceTreeRoot value
- Using the solution directory to create relative paths in the compilation dependency cache
- Managing sorting of suppress files
- Settings sections in .pvsconfig
- Outputing the initial position of the shifted line (for V002)
- Configuring the compilation dependency cache
- Dependency cache source file tracking mode
- Highlighting security-related issues
- Using the old C++ parser
- Disabling the C++ template instantiation
- Settings Override Mode
- Header file aliases
A configuration file is used to display and filter analyzer messages. The configuration file also enables you to set additional parameters for the analysis. These files are compatible only with projects written in C, C++, or C#.
Plugins for the following IDEs support configuration files:
- Visual Studio;
- Rider.
Utilities that support configuration files:
PVS-Studio_Cmd.exe;CLMonitor.exe(only in theanalyzeoranalyzeFromDumpmode);- C and C++ Compiler Monitoring UI (
Standalone.exe); CompileCommandsAnalyzer.exe(in theanalyzemode).
How to use configuration files in IDEs and other analysis tools
.pvsconfig in Visual Studio
To use a configuration file in Visual Studio, add the file at the project or solution level. Choose the necessary project or solution in the Solution Explorer window in the Visual Studio IDE. Click the Add New Item... context menu item and select PVS-Studio Filters File.
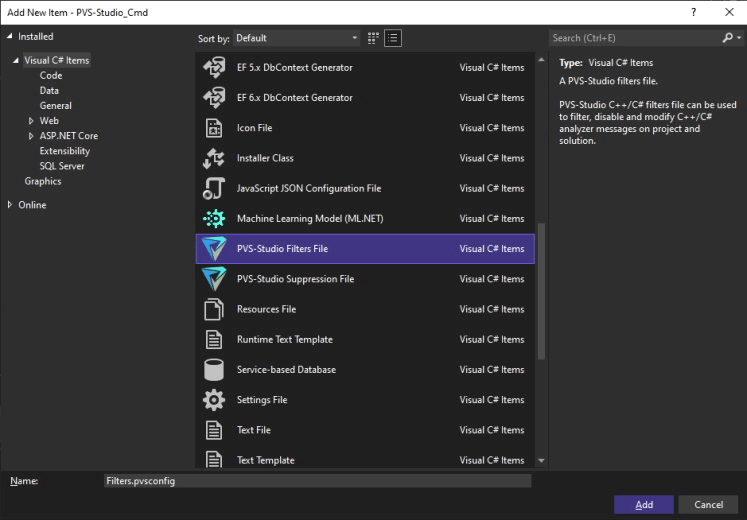
If there is no file template, you can add a simple text file with the .pvsconfig extension to the project or solution.
You can add multiple configuration files for each project/solution.
Configuration files added at the project level apply to all files in the project.
Adding //DISABLE_ANALYSIS_AFTER_BUILD line at the solution level .pvsconfig file hides the Analysis After Build (Modified Files Only) menu and disables incremental analysis for the corresponding solution. The changes will take effect upon reopening the solution.
.pvsconfig in CLion
There is no special template for adding a configuration file for CLion.
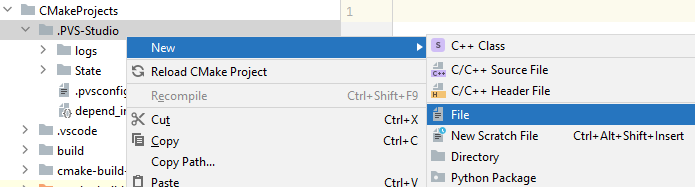
You can add the configuration file for CLion only at the project level. To use the file in CLion, add a new file with the .pvsconfig extension to the .PVS-Studio folder using the New > File context menu.
.pvsconfig in Rider
There is no special template for adding a configuration file in Rider.
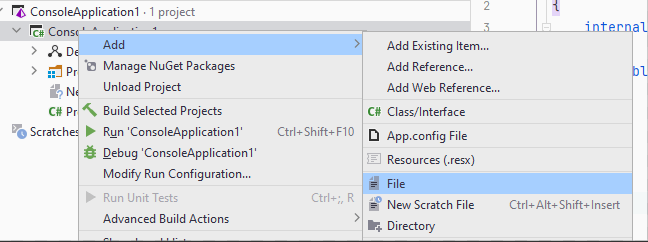
You can add the configuration file to Rider only at the project level. To use the diagnostic rule configuration file in Rider, add a new file with the .pvsconfig extension to the project via Solution Explorer.
.pvsconfig in PVS-Studio_Cmd.exe and pvs-studio-dotnet
When you run the analysis using either PVS-Studio_Cmd.exe or pvs-studio-dotnet, the configuration files from the project or solution being analyzed are automatically used. You can also specify the path to the additional .pvsconfig file using the --rulesConfig (-C) parameter:
PVS-Studio_Cmd.exe -t ProjName.sln -C \path\to\.pvsconfig
pvs-studio-dotnet -t ProjName.sln -C /path/to/.pvsconfig
In this case, the analyzer considers settings from both the configuration files included in the project or solution and the file provided as an argument.
.pvsconfig in CLMonitor.exe
You can specify the path to the configuration file as a command-line argument (the -c parameter):
CLMonitor.exe analyzeFromDump -d /path/to/compileDump.gz -c /path/to/.pvsconfig.pvsconfig in CompilerCommandsAnalyzer.exe
If you use the CompilerCommandsAnalyzer.exe utility, you can specify the path to the .pvsconfig file via the -R parameter:
CompilerCommandsAnalyzer.exe analyze ... -R /path/to/.pvsconfig.pvsconfig in Standalone.exe
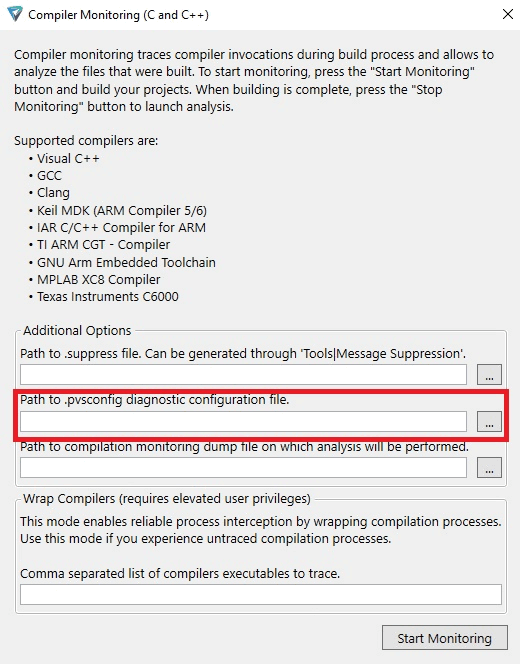
In Standalone.exe, you can specify the path to the file when you start monitoring.
Using global .pvsconfig file
A global diagnostic rule configuration file is used during all project checks. There can be several global .pvsconfig configuration files and PVS-Studio tools use them all.
To add the global configuration file, create a file with the .pvsconfig extension in the folder:
- For Windows:
%APPDATA%\PVS-Studio; - For Linux and macOS:
~/.config/PVS-Studio.
General functionality of configuration files
Adding entries to the configuration file
To set the settings in the configuration files, use special directives that start with the // characters. Each directive is written on a new line.
The example:
//-V::122
//-V::123
You can also add comments: write the # character at the beginning of the line.
The example:
# I am a commentFiltering the analyzer messages
Disabling individual diagnostic rules
To completely disable a certain diagnostic rule, use the following syntax pattern:
//-V::numberThe number parameter is the number of the diagnostic rule you want to disable (for example, 3022).
The example:
//-V::3022In this case, the V3022 warnings will be ignored.
To disable several diagnostic rules, you can list their numbers separating them by commas:
//-V::number1,number2,...,numberNThe example:
//-V::3022,3080This directive completely disables the V3022 and V3080 diagnostic rules.
Disabling a group of diagnostic rules
To disable diagnostic rules of a certain group, use the following directives:
//-V::GA
//-V::X64
//-V::OP
//-V::CS
//-V::MISRA
//-V::OWASP
The definition for each group:
- GA (General Analysis) are general analysis rules. The main set of PVS-Studio diagnostic rules;
- OP (Optimization) are diagnostic rules for optimization. These are tips to improve the code efficiency;
- X64 (64-bit) are diagnostic rules that detect specific errors related to the development of 64-bit applications and code migration from a 32-bit platform to a 64-bit one;
- CS (Customers' Specific) are highly specialized diagnostic rules based on user requests. By default, this group is disabled;
- MISRA are diagnostic rules based on the MISRA standard (Motor Industry Software Reliability Association). By default, this group is disabled;
- OWASP are diagnostic rules that detect security issues and check code for compliance with the OWASP ASVS standard. By default, this group is disabled.
To disable several groups of diagnostic rules, list them separating by commas.
The example:
//-V::GA,MISRADisabling all C++ or C# diagnostic rules
To disable all C++ or C# analyzer diagnostic rules, use the following directives:
//-V::C++
//-V::C#
Excluding warnings for certain diagnostic rules at specific levels
To disable warnings of a certain level, use the following syntax pattern:
//-V::number1,number2,...,numberN:levelnumber1,number2, etc. are the numbers of diagnostic rules that will be excluded from the analysis results (for example, 3022);levelis the warning level (1,2, or3).
1 is High-level warnings, 2 is the Medium-level warnings, and 3 is the Low-level warnings.
You can filter out warnings of several levels at once by listing the levels and separating them by commas.
The example:
//-V::3022,5623:1,3This directive filters out the warnings of the V3022 and V5623 diagnostic rules with High and Low levels.
Excluding warnings by the substring in a message
The analyzer can exclude warnings by the diagnostic rule number and substring contained in a message.
The syntax pattern is as follows:
//-V::number::{substring}numberis the number of diagnostic rules which message needs to be suppressed (for example, 3080);substringis a substring contained in the analyzer's message.
When using this template, the analyzer ignores the diagnostic rule with the following number and containing substring.
The syntax pattern to suppress warnings by the substring:
//-V::3022::{always true}In this case, the V3022 warnings with the always true substring in the message will be suppressed.
Excluding warnings by the certainty level and substring
You can filter out warnings by the certainty level and the substring simultaneously. The syntax pattern is the following:
//-V::number1,number2,...,numberN:level:{substring}number1,number2, etc. are the numbers of diagnostic rules that need to be excluded from the analysis results (for example, 3022);levelis the warning's level (1,2, or3);substringis a substring contained in the analyzer's message.
1 is High-level warnings, 2 is the Medium-level warnings, and 3 is the Low-level warnings.
You can filter out warnings of several levels at once by listing the levels and separating them by commas.
The example:
//-V::3022,5623:1,3:{always true}This directive filters out the warnings of V3022 and V5623 diagnostic rules at High and Low levels that contain the always true substring in the message.
Excluding warnings from specific groups at different levels
To exclude warnings from specific groups at different levels, use the following command:
//-V::category1,category2,...,categoryN:levelcategory1,category2, etc. are the names of the groups to be excluded (e.g. GA). For a list of groups and their descriptions, consult the Disabling a group of diagnostic rules section of the documentation.levelis the warning level (1,2, or3).
You can combine the group and level filters by separating them with a comma.
The example:
//-V::GA,MISRA:1,3The High- and Low-level warnings that fall into the GA and MISRA groups will be excluded.
Enabling individual diagnostic rules
Note. This setting is available only for C, C++, and C# projects.
To enable a certain diagnostic rule, use the following syntax pattern:
//+V::numbernumber is the number of the diagnostic rule you want to enable (for example, 3022).
The example:
//+V::3022In this case, the V3022 diagnostic rule will be enabled.
To enable several diagnostic rules, you can list their numbers separating them by commas:
//+V::number1,number2,...,numberNThe example:
//+V::3022,3080This directive will enable the V3022 and V3080 diagnostic rules.
Enabling a group of diagnostics
Note. This setting is available only for C, C++, and C# projects.
To enable diagnostic rules of a certain group, use the following directives:
//+V::GA
//+V::X64
//+V::OP
//+V::CS
//+V::MISRA
//+V::OWASP
To enable several diagnostic rule groups, you can list them separating by commas:
The example:
//+V::GA,MISRAMarking as False Alarm warnings issued for strings with the specified fragment
You can mark warnings issued for a certain string that includes the specified fragment as False Alarm. Use the following directive:
//-V:substring:numbersubstringis the substring in the string indicated by the analyzer;numberis the number of diagnostic rules which messages need to be suppressed (for example, 3080).
Note 1. The required substring (substring) must not contain spaces.
Note 2. Filtered messages still appear in the report and will be marked as False Alarm (FA).
The example:
public string GetNull()
{
  return null;
}

public void Foo()
{
  string nullStr = GetNull();
  Console.WriteLine(nullStr.Length);
}
For this code, the analyzer issues a warning: "V3080 Possible null dereference. Consider inspecting 'nullStr'."
To add the FA mark on warnings issued for such code, use the following directive in .pvsconfig:
//-V:Console:3080The directive adds the False Alarm mark to all V3080 warnings issued for the code lines with Console.
You can also add the False Alarm mark to multiple warnings at once by listing their numbers separated by commas:
//-V:substring:number1,number2,...,numberThe example:
//-V:str:3080,3022,3175The V3080, V3082, V3175 messages will be marked as False Alarm if there is the str substring in the code line indicated by the analyzer.
Adding a hash code to the False Alarm mark
With PVS-Studio 7.28, it is now possible to add an additional hash code to the False Alarm mark. If the line with this hash code changes, the warnings issued for this line will not be marked as False Alarms. This is because the hash code of the modified line differs from the hash code of the mark.
This setting helps recognize situations where a string with the False Alarm mark is modified.
To enable this feature, add the following flag to the configuration file:
//V_ENABLE_FALSE_ALARMS_WITH_HASHIn the code, the False Alarm mark with the hash code looks like this:
//-V817 //-VH "3652460326"Starting with PVS-Studio 7.30, it is possible to suppress only those messages that have an additional hash code added to the False Alarm mark:
//V_HASH_ONLY ENABLE
//V_HASH_ONLY ENABLE_VERBOSE
If this setting is applied, the lines that have the False Alarm mark without a hash code will not be suppressed.
The ENABLE setting includes a single V018 message for the entire project in the report. If the ENABLE_VERBOSE setting is applied, such a warning will be issued for each code line that contains the False Alarm mark without a hash code.
The setting can be disabled as follows:
//V_HASH_ONLY DISABLEThis may happen if applying this setting is required only for a certain code fragment.
Excluding files from the analysis
To exclude a file or a group of files from the analysis, use the directive:
//V_EXCLUDE_PATH fileMaskSeveral examples of masks:
//V_EXCLUDE_PATH C:\TheBestProject\thirdParty
//V_EXCLUDE_PATH *\UE4\Engine\*
//V_EXCLUDE_PATH *.autogen.cs
Starting with PVS-Studio 7.34, you can use the //V_ANALYSIS_PATHS comment with the skip-analysis mode.
The example:
//V_ANALYSIS_PATHS skip-analysis=C:\TheBestProject\thirdParty
//V_ANALYSIS_PATHS skip-analysis=*\UE4\Engine\*
//V_ANALYSIS_PATHS skip-analysis=*.autogen.cs
The process of how the masks are specified is described in the documentation.
Excluding projects from the analysis
Note: This setting is only available for solution-level configuration files (.pvsconfig). In other cases, it will be ignored.
Starting with 7.32, the PVS-Studio_Cmd.exe utility and the plugin for Visual Studio support excluding projects from the analysis in the following way:
//V_EXCLUDE_PROJECT projMaskprojMask is the project mask.
The example of using some masks:
//V_EXCLUDE_PROJECT C:\TheBestProject\thirdParty\3rdparty.vcxproj
//V_EXCLUDE_PROJECT *\TOCSharp.csproj
//V_EXCLUDE_PROJECT *\elsewhere\*.*proj
The mask generation syntax is the same as the syntax used to exclude files from the analysis. Only .vcxproj and .csproj projects can be excluded from the analysis.
You can also exclude a project from the analysis by setting the same path for the //V_EXCLUDE_PATH flag.
This feature is available only in the configuration file of the solution level, and it affects only PVS-Studio_Cmd.exe/pvs-studio-dotnet, and plugins for Visual Studio.
Ignoring configuration files
Note. This setting is available only for C and C++ projects.
Starting with version 7.34, PVS-Studio can ignore settings located in the source files and .pvsconfig diagnostic rule configuration files.
To enable this, you can use the //V_ANALYSIS_PATHS flag with the skip-settings mode.
The example:
//V_ANALYSIS_PATHS skip-settings=*\path\to\folder\*If you need to exclude files from the analysis and ignore the settings for these files, you can use the //V_ANALYSIS_PATHS flag with the skip mode.
The example:
//V_ANALYSIS_PATHS skip=*\path\to\source_or_pvsconfigCheck out the documentation on the syntax for creating masks.
Isolating settings for directories
Note. This setting is available only for the pvs-studio-analyzer utility.
Starting with version 7.36, the pvs-studio-analyzer utility supports a mode that searches for configuration files of diagnostic rules (.pvsconfig) in each directory and its parent directories for every translation unit. Each found *.pvsconfig file will be applied to all translation units in the directory and its subdirectories. To enable this mode, use the --apply-pvs-configs command line flag. You can learn more about this mode in the documentation about the pvs-studio-analyzer utility.
You can isolate settings in a directory from settings in parent directories. This is useful if you need to isolate settings in subprojects or third-party libraries. In this case, no configuration files of diagnostic rules from parent directories will be applied to the specified directories and their subdirectories.
To isolate settings via the configuration files of diagnostic rules, you can use:
- The
V_ANALYSIS_PATHSflag withisolate-settingsmode enables specifying the option in any configuration file. Both absolute and relative paths are supported. Relative paths are expanded via the path to the configuration file of diagnostic rules, for example:
//V_ANALYSIS_PATHS isolate-settings=path/to/isolate;isolate-settings=ThirdParty- The
//V_ISOLATE_CURRENT_DIRflag enables the directory isolation where the configuration file with the flag is located.
Ignoring global configuration files
Before running the analysis, PVS-Studio_Cmd generates the configuration of diagnostic rules from:
- global configuration files (in the
%AppData%\PVS-Studio\folder on Windows and in the~/.config/PVS-Studiofolder on Linux or macOS); - files passed through the
--rulesConfig(-C) option; - files added to the solution;
- files added to the project.
There may be a situation when the global configuration should not be applied during the analysis of some projects or solutions. To ignore global configuration files, add the following flag to the corresponding .pvsconfig file:
//IGNORE_GLOBAL_PVSCONFIGStarting with version 7.36, the pvs-studio-analyzer utility also supports this flag.
Specifying the file analysis timeout for a project/solution/system
If you run the analysis via the plugin interface (Visual Studio, Rider and CLion) or in the C and C++ Compiler Monitoring UI (Standalone.exe), you can specify a timeout after which the file analysis is terminated. If the analysis timeout is exceeded, the V006 warning is added to the analysis results. The warning contains information about the file that exceeded the timeout.
You can specify the file analysis timeout in .pvsconfig. For example, you can set a 10-minute (600-second) timeout with the following line:
//V_ANALYSIS_TIMEOUT 600If the timeout value specified in the .pvsconfig file is 0, the files are analyzed without timeout.
You can limit the file analysis time in certain projects/solutions/systems by specifying a timeout in .pvsconfig files of different levels:
- use the
--rulesConfig(-c) parameter inPVS-Studio_Cmd.exeto redefine the file analysis timeout for the current solution/project analysis; - use
%AppData%on Windows and~/.configon Linux, macOS to redefine the file analysis timeout for the system; - use
.slnto redefine the file analysis timeout for the current solution; - use
.csprojor.vcxprojto redefine the file analysis timeout for the current project.
Changing a certainty level of a diagnostic rule
The analyzer classifies warnings according to three certainty levels: High, Medium, and Low. Depending on the constructs used in the code, the analyzer evaluates the certainty of warnings and assigns them to the appropriate level in the report.
In some projects, it is important to find specific types of errors without considering the certainty level. However, there is also an opposite case when messages are of little use, but developers do not want disable them. In such cases, there is an option to manually set the High/Medium/Low level for diagnostic rules via the following directives:
- The
//V_LEVEL_1directive changes the certainty level to High; - The
//V_LEVEL_2directive changes the certainty level to Medium; - The
//V_LEVEL_3directive changes the certainty level to Low.
To change the certainty level, use the following directive:
//V_LEVEL_1::numberwhere number is the diagnostic rule number.
For example, to assign the third certainty level to the V3176 diagnostic rule, use the following directive:
//V_LEVEL_3::3176Changing the text of the analyzer messages
To change the substring in the analyzer message, use the following syntax:
//+Vnnn:RENAME:{originalString:replacementString}, ...Vnnnis the name of the diagnostic rule whose message you want to modify (for example, V624);originalStringis the original substring;replacementStringis the string that will replace the original one.
Take a look at an example of how the directive works. Suppose the code contains the number 3.1415 that triggers the V624 diagnostic rule. As a result, you get a message explaining that you need to replace 3.1415 with M_PI from the <math.h> library. However, the project uses a special math library that requires the use of its own constants. To ensure correct operation, add the directive to the configuration file.
The directive looks like this:
//+V624:RENAME:{M_PI:OUR_PI},{<math.h>:"math/MMath.h"}Then, the analyzer prompts you to use the OUR_PI constant from the math/MMath.h header file.
It is possible to add a line to the message.
Here is the directive for this:
//+Vnnn:ADD:{message}Vnnnis the name of the diagnostic rule whose message you want to modify (for example, V2003);messageis a string you need to add;
Take a look at an example. Here is the V2003 diagnostic rule message: "Explicit conversion from 'float/double' type to signed integer type.".
To add more information to this message, use the following directive:
//+V2003:ADD:{ Consider using boost::numeric_cast instead.}Now, the analyzer outputs a modified message: "Explicit conversion from 'float/double' type to signed integer type. Consider using boost::numeric_cast instead.".
Managing synchronization of suppress files
If you run the analysis via the plugin for Visual Studio or in the C and C++ Compiler Monitoring UI (Standalone.exe), you can disable the synchronization of suppress files by setting Specific Analyzer Settings/DisableSynchronizationOfSuppressFiles.
You can disable synchronization using .pvsconfig file of the solution level. To do this, add the following flag to the corresponding configuration file:
//DISABLE_SUPPRESS_FILE_SYNCTo enable synchronization via .pvsconfig, regardless of the value of the DisableSynchronizationOfSuppressFiles setting, use the following flag:
//ENFORCE_SUPPRESS_FILE_SYNCThis feature is available only in the configuration file of the solution level, and it affects only PVS-Studio_Cmd.exe/pvs-studio-dotnet, and plugins for Visual Studio.
Selecting the PVS-Studio version for analysis
Starting with version 7.24, PVS-Studio_Cmd.exe utility and the plugin for Visual Studio support the feature to specify the PVS-Studio core version for analyzing C++ projects in case several versions of PVS-Studio are installed on the computer.
Starting with version 7.36, PVS-Studio_Cmd.exe utility and the plugin for Visual Studio support the feature to specify the PVS-Studio core version for analyzing C# projects in case several versions of PVS-Studio are installed on the computer.
For PVS-Studio_Cmd.exe to run the analysis on the required version of the PVS-Studio core, the //PVS_VERSION::Major.Minor flag should be added to the solution-level .pvsconfig file, where
Major is a major version number, and Minor is a minor number.
The example:
//PVS_VERSION::7.24PVS-Studio_Cmd.exe determines the path to the core using information from the system registry which is written by the installer when installing PVS-Studio.
For C++ projects, the minimum supported value of PVS_VERSION is 7.24. This means that when using this setting for the C++ project analysis, you can run the PVS-Studio core version 7.24 or later.
For C# projects, the minimum supported value of PVS_VERSION is 7.15. This means that when using this setting for the C++ project analysis, you can run the PVS-Studio core version 7.15 or later.
If a new PVS-Studio version is installed into an already existing directory containing another PVS-Studio version, the version number in the registry for this directory will be updated.
The most recent PVS-Studio installation becomes the default one. This means that if version 7.23 was installed last, all plugins and PVS-Studio_Cmd.exe will have that same version. As a result, you will not be able to use the mechanism of selecting the PVS-Studio core versions. So, if you want to use older versions of PVS-Studio (7.23 and earlier), install them first and only then install PVS-Studio 7.24 or the newer version.
For all versions older than 7.24, it is necessary to specify in the registry the version and the path to the installation directory of the version, so that PVS-Studio_Cmd.exe can find the path to PVS-Studio core. The information is written to Computer\HKEY_LOCAL_MACHINE\SOFTWARE\WOW6432Node\ProgramVerificationSystems\PVS-Studio\Versions.
This feature is available only in the configuration file of the solution level, and it affects only PVS-Studio_Cmd.exe/pvs-studio-dotnet and plugins for Visual Studio.
Configuration files prioritization
Starting with PVS-Studio 7.25, the PVS-Studio_Cmd.exe utility and the plugin for Visual Studio support the feature of explicitly setting the priority of configuration files at the same level. To do this, use the //CONFIG_PRIORITY::number flag, where number is the priority value.
Starting with version 7.36, the pvs-studio-analyzer utility also supports this flag.
The example:
//CONFIG_PRIORITY::1The smaller the number, the higher the priority of the configuration file. Files that do not have this flag have minimal priority. Files having the same priority are treated in alphabetical order. For example, among the files Filter1.pvsconfig, Filter2.pvsconfig, and Filter3.pvsconfig, the settings from the Filter3.pvsconfig file will have higher priority.
The //CONFIG_PRIORITY flag affects only configuration files of the same level. In ascending order of priority, the configuration files are treated as follows:
- the Global Configuration file;
- Solution Level configuration files;
- Project Level configuration files;
- the file passed to the
PVS-Studio_Cmdutility via the--rulesConfig(-c) argument.
This feature is available only in the configuration file of the solution level, and it affects only PVS-Studio_Cmd.exe/pvs-studio-dotnet and plugins for Visual Studio.
Executing commands from the CustomBuild task before running the analysis
If you want PVS-Studio to execute commands from the CustomBuild task before running the analysis, add the following directive to the .pvsconfig file:
//EXECUTE_CUSTOM_BUILD_COMMANDSThis directive applies only to the .pvsconfig files passed via the command line and located at the global or solution level.
Take a look at the case where the directive might be useful.
Some Visual C++ projects can generate source code at build time using commands from the CustomBuild task. Running the analysis without generating the files can lead to errors. If you only need to generate the files, a complete build is useless (since it may take a long time).
In this case, it would be useful to specify the corresponding directive for PVS-Studio so that the analyzer could first execute the file generation commands and then perform the analysis.
Suppressing parsing errors
Sometimes the analyzer may issue a parsing error warning for a project that compiles perfectly. These errors may not be critical to the quality of the analysis. In this case, you can suppress them.
The parsing error has the following code:
Suppressing the V051 warning (the C# analyzer)
The C# analyzer issues V051 if there is at least one compilation error. To see all errors, run the command-line version of the analyzer with the --logCompilerErrors flag. The syntax for suppressing the errors looks like this:
//V_EXCLUDE_PARSING_ERROR:V051:{"ProjectName": "MyProject", "ErrorCode": "CS0012", "Message": "Some message"}
In this case, a compilation error that has the CS0012 code and the "Some message" message is suppressed for the (.csproj) MyProject project.
You do not need to combine information for suppression:
//V_EXCLUDE_PARSING_ERROR:V051:{"ProjectName": "MyProject"}: Suppresses errors in the MyProject project.//V_EXCLUDE_PARSING_ERROR:V051:{"ErrorCode": "CS0012"}: Suppresses all errors with the CS0012 code for all projects.//V_EXCLUDE_PARSING_ERROR:V051:{"Message": "Some message"}: Suppresses all errors with the "Some message" message.
You can use masks when specifying the message, for example:
//V_EXCLUDE_PARSING_ERROR:V051:{Message: "Some*"}
Note. Currently, parsing error suppression is available only for V051 (the C# analyzer).
Ignoring analysis settings from Settings.xml
The global Settings.xml file contains settings that affect the analysis result. For example, you can disable diagnostic rule groups.
To ignore the settings from Settings.xml during the analysis, use the //V_IGNORE_GLOBAL_SETTINGS ON flag. In this case, all diagnostic rule groups are enabled, and no path filters are applied.
To customize analysis settings, use configuration files (.pvsconfig).
This feature is available only in the configuration file of the solution level, and it affects only PVS-Studio_Cmd.exe/pvs-studio-dotnet and plugins for Visual Studio.
Using the solution directory as the SourceTreeRoot value
You can use the //V_SOLUTION_DIR_AS_SOURCE_TREE_ROOT flag to enable the solution directory as the SourceTreeRoot value.
To learn more about the SourceTreeRoot setting, please consult the separate documentation.
The parameter has higher priority than UseSolutionDirAsSourceTreeRoot from the Settings.xml file.
This feature is available only in the configuration file at the solution level, and it affects only PVS-Studio_Cmd.exe/pvs-studio-dotnet and plugins for Visual Studio.
Using the solution directory to create relative paths in the compilation dependency cache
Starting with PVS-Studio 7.34, there is the //V_SOLUTION_DIR_AS_DEPENDENCY_CACHE_SOURCE_TREE_ROOT flag that enables the usage of the solution directory as the root part of the path that is used to create relative paths in the compilation dependency cache.
This flag should be used in the file list checking mode and modified file analysis mode. The setting enables the generation of a compilation dependency cache, which can then be used on machines with different locations of the source files being analyzed.
This setting is similar to //V_SOLUTION_DIR_AS_SOURCE_TREE_ROOT, except that relative paths for files will be created in compilation dependency cache files rather than in the analyzer report.
This feature is available only in the configuration file at the solution level, and it affects only PVS-Studio_Cmd.exe/pvs-studio-dotnet and plugins for Visual Studio.
Managing sorting of suppress files
Starting with PVS-Studio 7.27, the contents of suppress files is sorted. This is required for proper use of files in version control systems and to prevent merge conflicts.
Messages are sorted in the following order: source file name, diagnostic rule code, string hash, and diagnostic rule description.
If you need to save old behavior and disable sorting mode, specify the //V_DISABLE_SUPPRESS_FILE_SORTING parameter.
This feature is available only in the configuration file at the solution level, and it affects only PVS-Studio_Cmd.exe/pvs-studio-dotnet and plugins for Visual Studio.
Settings sections in .pvsconfig
You can set specific rules for a certain PVS-Studio version.
The syntax:
//V_SECTION_BEGIN
//V_WHEN_VERSION: <CONDITION_SEQUENCE>
....
//V_SECTION_END
Each section contains three mandatory components:
//V_SECTION_BEGINis the section start;//V_WHEN_VERSION:is the condition for defining the section applicability;//V_SECTION_ENDis the section end.
The condition syntax:
<CONDITION_SEQUENCE> ::= <CONDITION> | <CONDITION_SEQUENCE> "|" <CONDTION>
<CONDITION> ::=  <SINGLE_VERSION_COMPARISON> | <RANGE_VERSIONS_COMPARISON>
<SINGLE_VERSION_COMPARISON> ::= <OP> <VERSION>
<RANGE_VERSIONS_COMPARISON> ::= "IN" <VERSION> "," <VERSION>
<OP> ::= "EQ" | "NE" | "LT" | "LE" | "GT" | "GE"
<VERSION> ::= <NUMBER> [ "." <NUMBER> ]
Conditions in V_WHEN_VERSION can be combined using the | character (the analog of the logical OR operator). Each subexpression is evaluated individually. If at least one of them is true, the section with all the directives in it is applied. Otherwise, it is discarded.
If you need to specify a range rather than the exact version, use the IN operator. Values are comma-separated. For example, the following expression includes all versions from 7.20 through 7.25:
....
//V_WHEN_VERSION: in 7.20,7.25
....
The supported operators in conditions, their aliases and description:
|
# |
Operator |
Alias |
Description |
|---|---|---|---|
|
1 |
EQ |
== |
Equal to |
|
2 |
NE |
!= |
Not equal to |
|
3 |
LT |
< |
Less than |
|
4 |
LE |
<= |
Less than or equal to |
|
5 |
GT |
> |
Greater than |
|
6 |
GE |
>= |
Greater than or equal to |
|
7 |
IN |
absent |
Range of values |
The text operators are case-insensitive. This condition entry will also be correct:
....
//V_WHEN_VERSION: == 7.17 | In 7.20,7.25 | GT 8
....
Restrictions:
- sections functionality is not available for solution-level parameters;
- each open section must be closed properly (the end of a file is not the correct termination of a section);
- nested sections are not allowed;
- when comparing versions, it is allowed to use only the Major and Minor analyzer versions, separated by a dot;
- conditions can be used only after the section has been opened;
- control directives may be used only after the condition.
Notes:
- directives outside of sections apply to all versions;
- if only the Major version is specified, the Minor one is implicitly treated as 0;
- when using an old version of the analyzer (before 7.31), all directives apply regardless of the section presence;
- in case of incorrect work with sections, a corresponding error is issued.
The section example:
//V_SECTION_BEGIN
//V_WHEN_VERSION: eq 7.30 | in 7.32,7.35 | gt 8
//+V::860
//V_ASSERT_CONTRACT
//-V::1100
//V_SECTION_END
Outputing the initial position of the shifted line (for V002)
Starting with version 7.35, PVS-Studio enables the output of the approximate initial shift position. The mechanism is useful if the analyzer warnings indicate incorrect line positions.
To output the initial shift positions, add the //+V002,VERBOSE flag. The analyzer issues the extended V002 message for every first potential shift in the file. The message includes the line expected at the specified position.
The example:
#include <iostream>
//+V002,VERBOSE
#pragma \
\
warning(push)
// The message V002 will be output here
void bar(int i) // This is the first line for which we detected a shift
{
  auto x = i % 5;
// This would be the wrong position for V609
  if ( i/x) // This is the correct position of V609
    std::cout << "bar" << std::endl;
}
void x()
{
    bar(5);
}Note. The analyzer cannot always accurately determine when the shift starts. This is due to the specifics of comparing the source and preprocessed files. It is necessary to consider macro expansion and the additional information the preprocessor inserts into the .i file.
Configuring the compilation dependency cache
Starting with PVS-Studio 7.35, you can manage the directory used to store and build relative paths for compilation dependency cache files.
To specify the directory for saving the cache files, use the //V_DEPENDENCY_CACHE_ROOT flag. It enables you to centralize the storage of compilation dependency caches for different projects.
To specify the root directory which will be used to create relative file paths in the compilation dependency cache, use the //V_DEPENDENCY_CACHE_SOURCE_ROOT flag. This setting enables you to obtain compilation dependency cache files that can be used on machines with different directories for the analyzed source files.
These flags should be used in the file list checking mode and modified file analysis mode.
The example:
//V_DEPENDENCY_CACHE_ROOT C:\Project\cache
//V_DEPENDENCY_CACHE_SOURCE_ROOT C:\Project
This feature is available only in the configuration file of the solution level, and it affects only PVS-Studio_Cmd.exe/pvs-studio-dotnet and plugins for Visual Studio.
Dependency cache source file tracking mode
Starting with PVS-Studio 7.35, you can specify the mode for tracking source files in the compilation dependency cache via the //V_DEPENDENCY_CACHE_TRACKING_MODE flag. There are several options:
- ModifiedFilesOnly tracks only modified source files in the hash.
- ModifiedAndWarningsContainingFiles tracks both modified files and those that contain warnings of previous analysis runs. Source files will be analyzed as long as they contain analyzer warnings.
- Disabled disables file tracking and dependency cache updates.
If the flag value is not Disabled, the plugin for Visual Studio enables you to run the modified file analysis mode via either Extension > PVS-Studio > Check > Modified Files in the menu or the Analyze Modified Files with PVS-Studio item in the context menu of solutions and projects.
When this flag is used, the compilation dependency cache is always updated regardless of the analysis mode (the standard or modified file analysis).
This feature is available only in the configuration file of the solution level, and it affects only PVS-Studio_Cmd.exe/pvs-studio-dotnet and plugins for Visual Studio.
Highlighting security-related issues
Starting with PVS-Studio 7.37, it is now possible to mark warnings related to potential security issues with additional markings in the SAST field of the analyzer output. To do this, add the //V_SEC_ID flag with the SHOW mode:
//V_SEC_ID: SHOWTo disable the setting, use the same flag with the HIDE mode:
//V_SEC_ID: HIDELet's look at an example:
void func()
{
  const wchar_t wstr[] = L"12345";
  printf("%s\n", wstr);
}
The following warning will be issued for this code: V576 Consider checking the second actual argument of the 'printf' function. The pointer to string of char type symbols is expected.
The analyzer will add the SEC-STR-FORMAT identifier into the SAST field of this warning when the setting is enabled.
Using the old C++ parser
Starting with PVS-Studio 7.38, the C and C++ analyzer uses a new implementation of the language parser. It provides more accurate processing of template constructs, improved parsing of the standard library, and code based on modern C++ language standards.
If you encounter analysis errors or slowdowns after updating PVS-Studio to version 7.38, you can switch back to using the old parser. To do this, add the //V_USE_OLD_PARSER flag. Please report any analysis issues to our technical support. This will help us improve the new parser and make it more stable.
Disabling the C++ template instantiation
This setting disables the template parameter instantiation during the C++ code analysis. This reduces RAM usage but makes the analysis less thorough.
The example:
//V_DISABLE_TEMPLATE_INSTANTIATIONSettings Override Mode
[Release 7.39] We've introduced a new feature that allows settings from lower-priority files to override those in higher-priority files.
Here's how it works:
To make a setting in a lower-priority file override a corresponding setting, wrap it with these tags:
//V_OVERRIDE ON
//Your overriding settings go here
//V_OVERRIDE OFF
To allow a setting in a higher-priority file to be overridden, wrap it with these tags:
//V_ALLOW_OVERRIDE ON
//These settings can be overridden
//V_ALLOW_OVERRIDE OFF
You can list multiple settings inside each block.
The override mechanism will not work with settings that accumulate values, because the values will not be overwritten, but only added together. For example:
V_EXCLUDE_PATH
V_EXCLUDE_PROJECT
V_ANALYSIS_PATHS
V_EXCLUDE_PARSING_ERROR
Important: If you try to override a setting in a high-priority file that is not wrapped in V_ALLOW_OVERRIDE, the system will throw an V020 error.
This option affects only PVS-Studio_Cmd.exe/pvs-studio-dotnet, and plugins for Visual Studio.
Header file aliases
[Release 7.42] Added the ability to define aliases for header files.
Some Visual Studio solutions may contain multiple projects that include the same files. Analysis may not work correctly for such projects due to specifics of preprocessing (PVS-Studio relies on file preprocessing to obtain translation units for analysis). The issue is that when a shared file is preprocessed, the headers included in it may be expanded relative to a different project.
To work around this problem, you can explicitly tell the analyzer that, in a specific file, the included files refer to the ones located in the current project. This is done using the following setting:
//V_INCLUDE_ALIAS source:"..\A.cpp", include-original:"stdafx.h", include-alias:"Project2\stdafx.h"
In this example, the shared file is ..\A.cpp; the path to it is specified relative to the analyzed project file. stdafx.h is the file included inside ..\A.cpp. Project2\stdafx.h is the file that is actually intended when including it, and the path to it is specified relative to ..\A.cpp.
This setting applies only to project-level pvsconfig files.
Was this page helpful?