
Our website uses cookies to enhance your browsing experience.

After you read this article, you'll have the knowledge to create your own static analyzer for C#. With the help of the analyzer, you can find potential errors and vulnerabilities in the source code of your own and other projects. Are you intrigued? Well, let's get started.
First, we will make your own static analyzer from the Visual Studio templates, without going deeper into the Roslyn API. This allows you to quickly get a working application and at least roughly see what analyzers can do.
And after that, we'll take a closer look at Roslyn API, as well as various tools that allow you to perform deeper and more complex analysis.
I'm sure that many developers have some mistakes that they or their friends often make when writing code. Most likely you would like to have a tool that detects such errors without your participation. This tool is called a static analyzer.
A static analyzer is an automatic tool that searches for potential errors and vulnerabilities in a program's source code without launching the app directly.
However, what if the existing analyzers can't find what you want? The answer is simple — you create your own utility or even an entire analyzer. C# developers are very lucky. Thanks to Roslyn they can create their own static analyzer. This is exactly what this article is about.
All our further static analyzer development will be based on the .NET Compiler Platform aka Roslyn. Thanks to the capabilities this platform provides, we can use C# to create our own static analysis tools. Here, the word 'static' means that the analyzed code doesn't need to be executed.
Since our analyzer is based on Roslyn, we should install the .NET Compiler Platform SDK for Visual Studio. One of the ways to do so is to open the Visual Studio Installer and select 'Visual Studio extension development' in the 'Workloads' tab.

After we install the necessary toolset, we can start creating the analyzer.
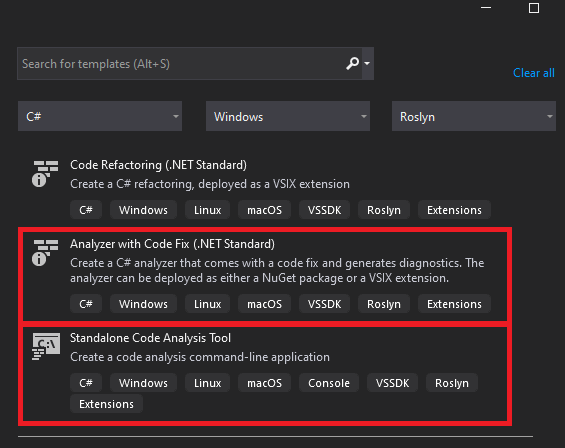
Open Visual Studio, click on 'Create a new project', select C#. Specify Windows as the platform and select Roslyn as the project type. After this we should see three projects templates. We are interested in two: 'Analyzer with Code Fix (.NET Standard)' and 'Standalone Code Analysis Tool'.
Let's study each of the templates.
After we create a new project with the 'Analyzer with Code Fix (.NET Standard)' template, we get a solution with five projects inside.
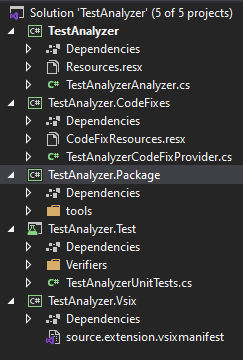
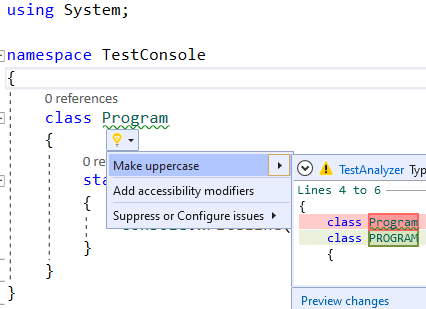
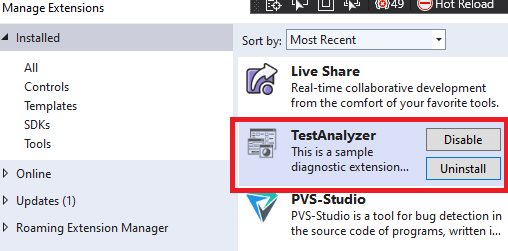
Now we pay our full attention to the first project called TestAnalyzer. The main work on the analyzer is performed in this exact project. Open the TestAnalyzerAnalyzer.cs file. It already contains an example of a simple rule for a static analyzer. The rule searches through all type(class) names in source code. If a type's name has lowercase characters, the rule underlines it with a green wavy line. Besides, if you hover the cursor on the type name marked with a wavy line, you see a familiar light bulb symbol. It offers to automatically correct the type name and bring all the characters to uppercase:
The easiest way to see it is to launch a new VS instance, which already has our sample diagnostic rule. You can use the same approach for debugging. To do this, mark TestAnalyzer.vsix as a startup project and launch the application. After that, a so-called experimental Visual Studio instance window will open. A new diagnostic rule is already added in this VS instance. It is integrated with the installed VSIX extension that has the name of our test analyzer.
Next, we create a new console project in the running VS instance. In this project, we see that the Program class name is underlined with a green wavy line. This is the work of our diagnostic rule, as the class name contains lowercase characters.
Now, let's create a new project of the 'Standalone Code Analysis Tool' type. In fact, it's a project of an ordinary console application with links to the necessary DLLs for analysis:
We can delete all methods except Main, from the Program.cs file.
Let's write the analyzer in such a way that it can find if statements, in which true and false branches are identical. Would you say that no one makes such mistakes? Surprisingly, this is a fairly common pattern. Look at the list of similar errors found in open source projects.
Let's say we are not satisfied if code contains a fragment like this:
public static void MyFunc1(int count)
{
  if (count > 100)
  {
    Console.WriteLine("Hello world!");
  }
  else
  {
    Console.WriteLine("Hello world!");
  }
}
So, we make the analyzer write the line number and the full path to the source file into the log file. Let's move on to writing code:
static void Main(string[] args)
{
  if (args.Length != 2)
    return;

  string solutionPath = args[0];
  string logPath = args[1];

  StringBuilder warnings = new StringBuilder();

  const string warningMessageFormat =
    "'if' with equal 'then' and 'else' blocks is found in file {0} at line {1}";

  MSBuildLocator.RegisterDefaults();
  using (var workspace = MSBuildWorkspace.Create())
  {
    Project currProject = GetProjectFromSolution(solutionPath, workspace);
    foreach (var document in currProject.Documents)
    {
      var tree = document.GetSyntaxTreeAsync().Result;
      var ifStatementNodes = tree.GetRoot()
                                 .DescendantNodesAndSelf()
                                 .OfType<IfStatementSyntax>();

      foreach (var ifStatement in ifStatementNodes)
      {
        if (ApplyRule(ifStatement))
        {
          int lineNumber = ifStatement.GetLocation()
                                      .GetLineSpan()
                                      .StartLinePosition.Line + 1;

          warnings.AppendLine(String.Format(warningMessageFormat,
                                            document.FilePath,
                                            lineNumber));
        }
      }
    }

    if (warnings.Length != 0)
      File.AppendAllText(logPath, warnings.ToString());
  }
}
In our case, we use a console application and not a plugin for VS. Thus, we need to specify the path to the solution file, which we are going to analyze. In order to get the solution, we use the MSBuildWorkspace class and the OpenSolutionAsync method. In its turn, the Solution class contains the Projects property, which stores the project entities. In my case, I created a new solution with a single console application project. Therefore, to get the project entity, I wrote the following method:
static Project GetProjectFromSolution(String solutionPath,
                                      MSBuildWorkspace workspace)
{
  Solution currSolution = workspace.OpenSolutionAsync(solutionPath)
                                   .Result;
  return currSolution.Projects.Single();
}
When reviewing the 'Analyzer with Code Fix' project template, we did not change the provided template code. Now, we want to write a rule according to which our analyzer would work. In this regard, it is necessary to clarify several theoretical points.
Roslyn itself stores source file representations as trees. Look at the following code example:
if (number > 0)
{

}
Roslyn presents it as a tree with the following structure:

The tree nodes are blue in the picture. We will work with them specifically. In Roslyn, such trees are represented as the SyntaxTree object types. As you can see in the picture, the tree nodes differ and each of them is represented by its own type. For example, the IfStatement node is represented by the IfStatementSyntax class object. All the nodes in their inheritance hierarchy originate from the SyntaxNode class. And only then they add some specific properties and methods to the ones they've inherited from the SyntaxNode class. For example, the IfStatementSyntax contains the Condition property. Condition, in turn, is a node of the ExpressionSyntax type. This order is natural for an object that represents the conditional if construction.
When we work with the necessary tree nodes, we can create logic for rules, according to which our static analyzer will work. For example, in order to determine in which IfStatement operators the true and false branches are completely identical, you need to do the following:
Based on the algorithm described above, you can write the ApplyRule method:
static bool ApplyRule(IfStatementSyntax ifStatement)
{
  if (ifStatement?.Else == null)
    return false;

  StatementSyntax thenBody = ifStatement.Statement;
  StatementSyntax elseBody = ifStatement.Else.Statement;

  return SyntaxFactory.AreEquivalent(thenBody, elseBody);
}
As a result we were able to write a rule that would allow us to no longer worry about copy-paste errors in if-else branches.
In my opinion, you should base your choice on what you want to get from the analyzer.
If you write a static analyzer that should monitor compliance with the code style your company requires, then use a project like 'Analyzer with Code Fix'. Your analyzer will be conveniently integrated into the VS environment as an extension. Developers will see the results of its work right when writing code. Besides, with API from Roslyn, you can turn on hints (how to change code) and even automatic correction.
If you plan to use the analyzer as a separate application and not as a plugin, choose the 'Standalone Code Analysis Tool' project. Let's say that you want to incorporate the analyzer into your CI process and test projects on a separate server. Another advantage — the analyzer in the form of the extension for VS exists inside the 32-bit devenv.exe process. This process can use only a limited amount of memory. The analyzer as a separate application isn't afraid of such restrictions. However, Microsoft promises to make Visual Studio 2022 64-bit. If you make your analyzer for this IDE version, these restrictions on memory consumption shouldn't affect you.
The information in this this article can help you quickly write your own static analyzer that will solve your problems. What if you want not just to solve your problems, but detect a wide range of code defects? Then you have to spend your time and energy on learning how to use static flow analysis, symbolic calculations, method annotation, and so on. Only after that your analyzer will be able to compete with the paid ones and be useful for a large number of developers. If you don't want to spend that much time on this, you can use one of the existing analyzers. There is a variety of them, both paid and free. Here's a list of tools for static code analysis. If you want to see what these tools can do, read the article 'Top 10 bugs found in C# projects in 2020'.
Besides, don't forget that such analyzers provide some part of their functionality via additional extensions for various IDEs. It's convenient if plugin allows you to launch the analyzer within the IDE. You do not need to collapse the editor and launch a separate application. The plugin can also allow you to view the analysis results inside the IDE.
We have inspected the templates that Visual Studio provides to create a new static code analyzer. Now let's take a closer look at Roslyn API so we can use it efficiently and correctly. The syntax tree is the first thing we need to get acquainted with.
A compilation object uses the source code to build a syntax tree for each .cs file. You can see one of the trees in the Syntax Visualizer window. If you have .NET Compiler Platform SDK for Visual Studio, you can find this window in View -> Other Windows -> Syntax Visualizer.
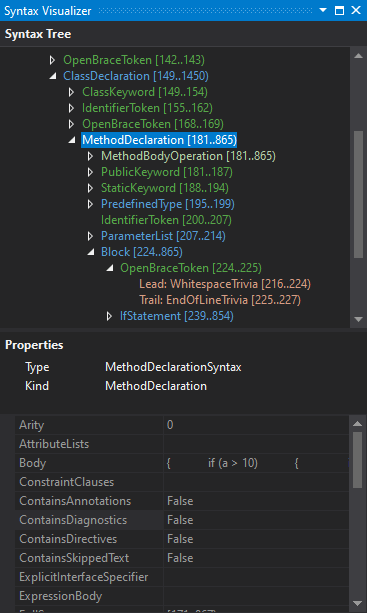
This is a very useful tool. It is especially useful for those who are just getting started with the tree structure and the element types represented in it. When moving through code in the Visual Studio editor, Syntax Visualizer goes to the corresponding tree element of the code fragment and highlights it. The Syntax Visualizer window also shows some properties for the currently selected element. For example, in the screenshot above, we see a specific type MethodDeclarationSyntax for the MethodDeclaration highlighted element.
For more visualization, you can select an element in the Syntax Visualizer window and invoke this element's context menu. As a result, you get a window that visualizes the syntax tree built for the selected element:
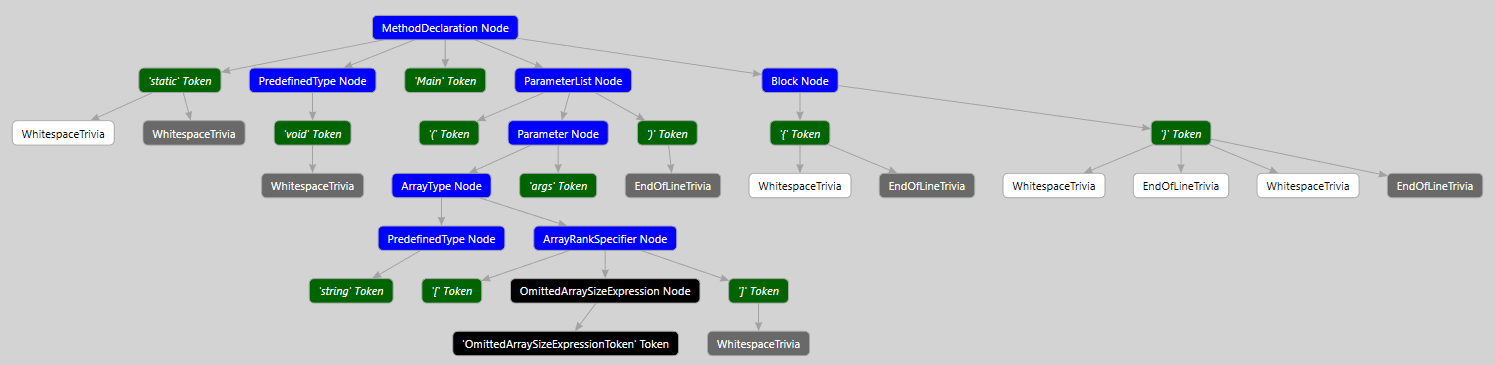
If you don't see this element in the context menu, install DGML editor. You can do it via the Visual Studio Installer. Open the Visual Studio Installer and choose More -> Modify next to the desired VS instance. Then, go to Individual Component -> Code tools -> DGML editor.
However, this tool has its disadvantages:
Earlier in this article, we've mentioned a tree that Roslyn builds for C# code:
if (number > 0)
{

}
This picture shows that the tree consists of elements represented by four colors. We can divide all tree elements into three groups:
Let's take a closer look at every group.
Syntax nodes represent syntactic constructions: declarations, operators, expressions, etc. When a tool analyzes the code, the main work falls on the node processing. The SyntaxNode abstract class is the basic node type. Every node that represents a particular language construction has a type, inherited from SyntaxNode. It defines a number of properties that simplify working with the tree. Here are some types along with their corresponding language constructs:
For example, the IfStatementSyntax class has a functionality that was inherited from the SyntaxNode class and has other useful properties, such as Condition, Statement and Else. The Condition node represents the operator condition; the Statement node represents the body of the if statement; and the Else node represents the else block.
The SyntaxNode abstract class provides the developer with methods that are common for all nodes. Some of them are listed below:
Besides, a number of properties are defined in the class. One of the most commonly used among them is Parent, which contains a reference to the parent node.
When creating a rule based on the "Standalone Code Analysis Tool" project template, we got nodes of the IfStatementSyntax type. Then we worked with them by accessing the tree root and executing a LINQ query that selects nodes necessary for our analysis. A more elegant solution is to use the CSharpSyntaxWalker class. CSharpSyntaxWalker is an abstract class. When we call the Visit method, the class traverses the node and its descendant nodes, which are passed to Visit. CSharpSyntaxWalker performs depth-first traversal. For each node encountered, it calls the Visit method corresponding to the node type. For example, for an instance of the ClassDeclarationSyntax type it calls the VisitClassDeclaration method that takes the node of this type as a parameter. In our case, we need to create a class inherited from the CSharpSyntaxWalker. Then we override the method, which is called when CSharpSyntaxWalker visits a particular C# construct.
public class IfWalker : CSharpSyntaxWalker
{
  public StringBuilder Warnings { get; } = new StringBuilder();

  const string warningMessageFormat =
    "'if' with equal 'then' and 'else' blocks is found in file {0} at line {1}";

  static bool ApplyRule(IfStatementSyntax ifStatement)
  {
    if (ifStatement.Else == null)
      return false;

    StatementSyntax thenBody = ifStatement.Statement;
    StatementSyntax elseBody = ifStatement.Else.Statement;

    return SyntaxFactory.AreEquivalent(thenBody, elseBody);
  }

  public override void VisitIfStatement(IfStatementSyntax node)
  {
    if (ApplyRule(node))
    {
      int lineNumber = node.GetLocation()
                           .GetLineSpan()
                           .StartLinePosition.Line + 1;

      warnings.AppendLine(String.Format(warningMessageFormat,
                                        node.SyntaxTree.FilePath,
                                        lineNumber));
    }
    base.VisitIfStatement(node);

  }
}
Note that the overridden VisitIfStatement method internally calls the base.VisitIfStatement method. This is necessary because the basic implementations of the Visit methods initiate child nodes's traversal. If you want to stop it, then don't call the basic implementation of this method when overriding the method.
Let's create a method, that uses our IfWalker class instance to start tree traversal:
public static void StartWalker(IfWalker ifWalker, SyntaxNode syntaxNode)
{
   ifWalker.Warnings.Clear();
   ifWalker.Visit(syntaxNode);
}
This is how the Main method looks like in this case:
static void Main(string[] args)
{
  string solutionPath = @"D:\Test\TestApp.sln";
  string logPath = @"D:\Test\warnings.txt";

  MSBuildLocator.RegisterDefaults();
  usng (var workspace = MSBuildWorkspace.Create())
  {
    Project project = GetProjectFromSolution(solutionPath, workspace);

    foreach (var document in project.Documents)
    {
      var tree = document.GetSyntaxTreeAsync().Result;
      var ifWalker = new IfWalker();
      StartWalker(ifWalker, tree.GetRoot());

      var warnings = ifWalker.Warnings;
      if (warnings.Length != 0)
        File.AppendAllText(logPath, warnings.ToString());
    }
  }
}
It's up to you to choose which approach is best for you to get nodes for the analysis. You can write a LINQ query. You can override the methods of the CSharpSyntaxWalker class that are called when CSharpSyntaxWalker visits certain C# nodes. Your choice depends only on what's most suitable your task. I think traversal methods from the CSharpSyntaxWalker should be overridden if we plan to add a lot of diagnostic rules to the analyzer. If your utility is simple and aims at processing a specific node type, you can use a LINQ query to collect all the necessary C# nodes.
Syntax tokens are language grammar terminals. Syntax tokens are elements that are not further analyzed — identifiers, keywords, special characters. We barely work with them during the analysis. During the analysis, we use tokens to obtain their textual representation or to check the token type. Tokens are the tree leaves, they don't have child nodes. Besides, tokens are instances of the SyntaxToken structure, i.e. they are not inherited from SyntaxNode. However, tokens, just like nodes, may have syntax trivia. We'll get back to it in one of the article sections.
The main properties of the SyntaxToken are:
Let's create a simple diagnostic rule that uses syntax tokes. This rule is triggered if a method name doesn't start with a capital letter:
class Program
{
  const string warningMessageFormat =
    "Method name '{0}' does not start with capital letter " +
    "in file {1} at {2} line";

  static void Main(string[] args)
  {
    if (args.Length != 2)
      return;

    string solutionPath = args[0];
    string logPath = args[1];

    StringBuilder warnings = new StringBuilder();

    MSBuildLocator.RegisterDefaults();
    using (var workspace = MSBuildWorkspace.Create())
    {
      Project project = GetProjectFromSolution(solutionPath, workspace);

      foreach (var document in project.Documents)
      {
        var tree = document.GetSyntaxTreeAsync().Result;

        var methods = tree.GetRoot()
                          .DescendantNodes()
                          .OfType<MethodDeclarationSyntax>();

        foreach (var method in methods)
        {
          if (ApplyRule(method, out var methodName))
          {
            int lineNumber = method.Identifier
                                   .GetLocation()
                                   .GetLineSpan()
                                   .StartLinePosition.Line + 1;

            warnings.AppendLine(String.Format(warningMessageFormat,
                                              methodName,
                                              document.FilePath,
                                              lineNumber));
          }
        }
      }
    }

    if (warnings.Length != 0)
        File.WriteAllText(logPath, warnings.ToString());
  }

  static bool ApplyRule(MethodDeclarationSyntax node, out string methodName)
  {
    methodName = node.Identifier.Text;
    return methodName.Length != 0 && !char.IsUpper(methodName[0]);
  }
}
In this rule, the Identifier property of the MethodDeclarationSyntax class determines whether a method name doesn't start with a capital letter. This property stores a token that checks the first character of its text representation.
Syntax trivia (additional syntactic information) includes the following tree elements: comments, preprocessor directives, various formatting elements (spaces, newline characters). These tree nodes are not descendants of the SyntaxNode class. The syntax trivia elements don't go into the IL code. However, they are represented in the syntax tree. Thanks to this, you can get completely identical source code from the existing tree, along with all the elements contained in all instances of the SyntaxTrivia structure. This tree feature is called full fidelity. The syntax trivia elements always belong to a token. There are Leading trivia and Trailing trivia. Leading trivia is additional syntactic information that precedes the token. Trailing trivia is additional syntactic info that follows the token. All elements of the additional syntactic information are of the SyntaxTrivia type. If you want to determine what exactly the element is, use the SyntaxKind enumeration along with the Kind and IsKind methods:
Look at the following code:
#if NETCOREAPP3_1
  b = 10;
#endif
  //Comment1
  a = b;
Here's what the directed syntax graph looks like for the code above:
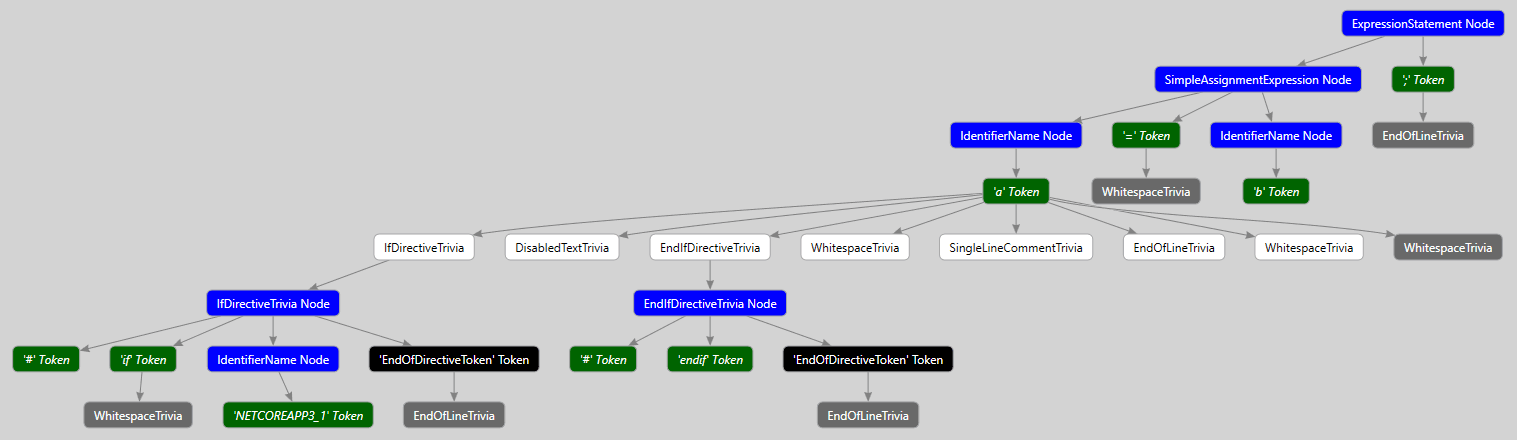
You can see that the 'a' token includes such syntax trivia as the preprocessor directives #if NETCOREAPP3_1 and #endif, the text itself inside these directives, the space and end-of-line characters, as well as a one-line comment. The '=' token has only one syntax trivia element attached to it. It's the space character. And the ';' token corresponds to the end-of-line character.
In addition to diagnostic rules based on tree node analysis, you can also create rules that analyze syntax trivia elements. Let's imagine that a company issued a new coding requirement: do not write the comments that are longer than 130 characters. We decided to check our project for such "forbidden" comments. We use a simple analyzer that parses syntax trivia elements. The code structure of this rule is almost identical to the rule that we created on the base of the "Standalone Code Analysis Tool" project template. But now, since we need comments, we call the DescendantTrivia method instead of calling the DescendantNodes method. After that we choose only those SyntaxTrivia, whose type is either SingleLineCommentTrivia, or MultiLineCommentTrivia, or SingleLineDocumentationCommentTrivia:
....
var comTriv = tree.GetRoot().DescendantTrivia()
                  .Where(n =>   n.IsKind(SyntaxKind.SingleLineCommentTrivia)
                             || n.IsKind(SyntaxKind.
                                         SingleLineDocumentationCommentTrivia)
                             || n.IsKind(SyntaxKind.MultiLineCommentTrivia));
....
We also added the new SingleLineCommentFormatMessage and MultiLineCommentFormatMessage format messages for single-line and multi-line comments:
const string PleaseBreakUpMessage = "Please, break up it on several lines.";

string SingleLineCommentFormatMessage =
    "Length of a comment at line {0} in file {1} exceeds {2} characters. "
  + PleaseBreakUpMessage;

string MultiLineCommentFormatMessage =
    "Multiline comment or XML comment at line {0} in file {1} contains "
  + "individual lines that exceeds {2} characters."
  + PleaseBreakUpMessage;
The last thing that we changed was the ApplyRule method:
void ApplyRule(SyntaxTrivia commentTrivia, StringBuilder warnings)
{
  const int MaxCommentLength = 130;

  const string PleaseBreakUpMessage = ....;

  string SingleLineCommentFormatMessage = ....;

  string MultiLineCommentFormatMessage = ....;

  switch (commentTrivia.Kind())
  {
    case SyntaxKind.SingleLineCommentTrivia:
    case SyntaxKind.SingleLineDocumentationCommentTrivia:
      {
        if (commentTrivia.ToString().Length > MaxCommentLength)
        {
          int line = commentTrivia.GetLocation().GetLineSpan()
                                  .StartLinePosition.Line + 1;

          string filePath = commentTrivia.SyntaxTree.FilePath;
          var message = String.Format(SingleLineCommentFormatMessage,
                                      line,
                                      filePath,
                                      MaxCommentLength);
          warnings.AppendLine(message);
        }
        break;
      }
    case SyntaxKind.MultiLineCommentTrivia:
      {
        var listStr = commentTrivia.ToString()
                                   .Split(new string[] { Environment.NewLine },
                                          StringSplitOptions.RemoveEmptyEntries
                                          );

        foreach (string str in listStr)
        {
          if (str.Length > MaxCommentLength)
          {
            int line = commentTrivia.GetLocation().GetLineSpan()
                                    .StartLinePosition.Line + 1;

            string filePath = commentTrivia.SyntaxTree.FilePath;
            var message = String.Format(MultiLineCommentFormatMessage,
                                        line,
                                        filePath,
                                        MaxCommentLength);

            warnings.AppendLine(message);
          }
        }
        break;
      }
  }
}
Now the ApplyRule method checks that single-line comments do not exceed 130 characters. In the case of multi-line comments, this method checks each comment line individually. If the condition is met, we add the corresponding message to warnings.
As a result, the Main method, which was designed to search for comments where strings exceed 130 characters, has the following code:
static void Main(string[] args)
{
  string solutionPath = @"D:\Test\TestForTrivia.sln";
  string logPath = @"D:\Test\warnings.txt";

  MSBuildLocator.RegisterDefaults();
  using (var workspace = MSBuildWorkspace.Create())
  {
    StringBuilder warnings = new StringBuilder();
    Project project = GetProjectFromSolution(solutionPath, workspace);

    foreach (var document in project.Documents)
    {
      var tree = document.GetSyntaxTreeAsync().Result;
      var comTriv = tree.GetRoot()
                        .DescendantTrivia()
                        .Where(n =>
                                 n.IsKind(SyntaxKind.SingleLineCommentTrivia)
                              || n.IsKind( SyntaxKind
                                          .SingleLineDocumentationCommentTrivia)
                              || n.IsKind(SyntaxKind.MultiLineCommentTrivia));

      foreach (var commentTrivia in comTriv)
          ApplyRule(commentTrivia, warnings);
    }

    if (warnings.Length != 0)
      File.AppendAllText(logPath, warnings.ToString());
  }
}
Beside comments, you can also write a rule that searches for preprocessor directives. You can use the same IsKind method to determine the contents of the preprocessor directives.
methodDeclaration.DescendantTrivia()
.Any(trivia => trivia.IsKind(SyntaxKind.IfDirectiveTrivia));In the examples above, we used syntactic trees and traversed their elements to analyzer projects. In many cases, traversing a syntax tree with CsharpSyntaxWalker is insufficient — we need to use additional methods. And here comes the semantic model. A compilation uses a syntax tree to obtain an object of the SemanticModel type. The Compilation.GetSemanticModel is used to do this. It takes an object of the SyntaxTree type as a required parameter.
A semantic model provides information about various entities: methods, local variables, fields, properties, etc. You need to compile your project without errors in order to obtain a correct semantic model.
So, to get a semantic model, we need an instance of the Compilation class. One of the ways to get a compilation object is to call the GetCompilationAsync method for the Project class instance. Earlier in this article we described how to get and use an instance of this class.
Compilation compilation = project.GetCompilationAsync().Result;If you want to get a semantic model, call the GetSemanticModel method for the compilation object and pass an object of the SyntaxTree type:
SemanticModel model = compilation.GetSemanticModel(tree);Another way to get a semantic model is to call the Create method from the CSharpCompilation class. We'll use this method in examples further in this article.
A semantic model provides access to the so-called symbols. They, in turn, allow you to get the information about the entity itself (be it a property, method, or something else). This information is necessary for the analysis. We can divide symbols into two categories:
Every symbol contains the information about the type and namespace, where a particular element is defined. We can find out exactly where an element was defined: in the source code that you have access to, or in an external library. Besides, you can get information about whether the analyzed element is static, virtual, etc. All this information is provided through the ISymbol base interface functionality.
Let's use the following situation as an example. Suppose, for the analysis, you need to determine if a called method was overridden. In other words, you need to determine if the called method was marked by the override modifier during the declaration. In this case, we need a symbol:
static void Main(string[] args)
{
  string codeStr =
    @"
    using System;

    public class ParentClass
    {
      virtual public void Mehtod1()
      {
        Console.WriteLine(""Hello from Parent"");
      }
    }

    public class ChildClass: ParentClass
    {
      public override void Method1()
      {
        Console.WriteLine(""Hello from Child"");
      }
    }

    class Program
    {
      static void Main(string[] args)
        {
          ChildClass childClass = new ChildClass();
          childClass.Mehtod1();
        }
    }";

  static SemanticModel GetSemanticModelFromCodeString(string codeString)
  {
    SyntaxTree tree = SyntaxFactory.ParseSyntaxTree(codeStr);

    var msCorLibLocation = typeof(object).Assembly.Location;
    var msCorLib = MetadataReference.CreateFromFile(msCorLibLocation);

    var compilation = CSharpCompilation.Create("MyCompilation",
      syntaxTrees: new[] { tree }, references: new[] { msCorLib });

    return compilation.GetSemanticModel(tree);
  }

  var model = GetSemanticModelFromCodeString(codeStr);

  var methodInvocSyntax = model.SyntaxTree.GetRoot()
                               .DescendantNodes()
                               .OfType<InvocationExpressionSyntax>();

  foreach (var methodInvocation in methodInvocSyntax)
  {
    var methodSymbol = model.GetSymbolInfo(methodInvocation).Symbol;
    if (methodSymbol.IsOverride)
    {
      //Apply your additional logic for analyzing method.
    }
  }
}
The GetSemanticModelFromCodeString method parses codeStr passed as the codeString parameter and gets a syntax tree for it. After that an object of the CSharpCompilation type is created. This object is a result of compiling a syntax tree, that was obtained from the codeStr. We call the CSharpCompilation.Create method to run compilation. An array of syntax trees (source code to be compiled) and links to libraries are passed to this method. To compile codeStr, you need a reference only to the C# base class library - mscorlib.dll. After that, a semantic model object is returned via the CSharpCompilation.GetSemanticModel method call. A semantic model is used to get the SymbolInfo structure for the node corresponding to the method call. We have the semantic model object returned by CSharpCompilation.GetSemanticModel. This object's GetSymbolInfo method is called, with the node passed to it as a parameter. After we get SymbolInfo, we call its Symbol property. This property returns the symbol object, which contains the semantic information about the node passed to the GetSymbolInfo method. When we get the symbol, we can refer to its IsOverride property and determine if the method was obtained via the override modifier.
Some readers may suggest another way to determine whether a method is overridden – without using the semantic model:
....
var methodDeclarsSyntax = model.SyntaxTree.GetRoot()
                               .DescendantNodes()
                               .OfType<MethodDeclarationSyntax>();
....
foreach(var methodDeclaration in methodDeclarsSyntax)
{
  var modifiers = methodDeclaration.Modifiers;
  bool isOverriden =
    modifiers.Any(modifier => modifier.IsKind(SyntaxKind.OverrideKeyword));
}
This way also works, but not in all cases. For example, if the method isn't declared in the source file for which the syntax tree was obtained, we cannot get a declaration for the necessary method. A more indicative case is when the called method was declared in an external library: in this scenario successful analysis cannot do without the semantic model.
There are a number of derived types, from which we can get more specific information about an object. Such interfaces include IFieldSymbol, IPropertySymbol, IMethodSymbol and others. If we cast the ISymbol object to a more specific interface, we'll get access to properties specific to this interface.
For example, if we use the cast to IFieldSymbol, we can refer to the IsConst field and find out whether the node is a constant field. And if we use the IMethodSymbol interface, we can find out whether the method returns any value.
For symbols the semantic model defines the Kind property, which returns the elements of the SymbolKind enumeration. With this property we can find out what we are currently working with: a local object, a field, an assembly, etc. Also, in most cases, the value of the Kind property corresponds to a specific symbol type. This exact feature is used in the following code:
static void Main(string[] args)
{
  string codeStr =
    @"
    public class MyClass
    {
      public string MyProperty { get; }
    }

    class Program
    {
      static void Main(string[] args)
      {
        MyClass myClass = new MyClass();
        myClass.MyProperty;
      }
    }";

  ....
  var model = GetSemanticModelFromCodeString(codeStr);

  var propertyAccessSyntax = model.SyntaxTree.GetRoot().DescendantNodes()
                                  .OfType<MemberAccessExpressionSyntax>()
                                  .First();

  var symbol = model.GetSymbolInfo(propertyAccessSyntax).Symbol;
  if (symbol.Kind == SymbolKind.Property)
  {
    var pSymbol = (IPropertySymbol)symbol;

    var isReadOnly = pSymbol.IsReadOnly; //true
    var type = pSymbol.Type;             // System.String
  }
}
After we cast a symbol to IPropertySymbol, we can access properties that help to obtain additional information. Again, a simple example: MyProperty is accessed in the same source file where its declaration is located. This means you can obtain information, that the property doesn't have a setter, without using a semantic model. If the property is declared in another file or library, then the use of the semantic model is inevitable.
When you need to obtain object type information for an object represented by a node, you can use the ITypeSymbol interface. To get it, call the GetTypeInfo method for an object of the SemanticModel type. This method returns the TypeInfo structure, that contains 2 important properties:
Here is an example of how you get the type of a property that is assigned a value:
static void Main(string[] args)
{
  string codeStr =
    @"
    public class MyClass
    {
      public string MyProperty { get; set; }

      public MyClass(string value)
      {
        MyProperty = value;
      }
    }";
  ....

  var model = GetSemanticModelFromCodeString(codeStr);

  var assignmentExpr = model.SyntaxTree.GetRoot().DescendantNodes()
                            .OfType<AssignmentExpressionSyntax>()
                            .First();

  ExpressionSyntax left = assignmentExpr.Left;

  ITypeSymbol typeOfMyProperty = model.GetTypeInfo(left).Type;
}
If you use the ITypeSymbol interface, returned by these properties, you can get all the information about the necessary type. This information is extracted by accessing the properties, some of which are listed below:
Accessing the semantic model during the analysis has its price. Tree traversal operations are faster than obtaining a semantic model. Therefore, if you want to get different symbols for nodes belonging to the same syntax tree, you need to get the semantic model only once. Then, if necessary, refer to the same instance of the SemanticModel class.
As additional information about using the semantic model, I also recommend using the following resources:
Well, I think the information presented here is enough to start an in-depth study of the capabilities of Roslyn. You can even write a simple – or maybe complex – static analyzer. Undoubtedly, to create serious tools, you need to take into account many different nuances and learn much more about both static analysis in general and Roslyn. This article, I hope, will be an excellent assistant at the beginning of your journey.
For a more detailed study of the Roslyn API, I advise you to study the documentation on the Microsoft website. If you want to improve, fix or study the source code of this API, then welcome to its GitHub repository. Believe me, there is still a lot to improve and fix in its API. For example, here is one article: "We check the source code of Roslyn". There we checked the Roslyn API source code with the help of the PVS-Studio static analyzer and found a lot of errors.
0
0
0
0