Let's say you use GitHub, write code, and do other fun stuff. You also use a static analyzer to enhance your work quality and optimize the timing. Once you come up with an idea - why not view the errors that the analyzer gave right in GitHub? Yeah, and also it would be great if it looked nice. So, what should you do? The answer is very simple. SARIF is right for you. This article will cover what SARIF is and how to set it up. Enjoy the reading!

SARIF (Static Analysis Results Interchange Format) is a JSON-based format for showing results of static analysis tools. That is, we just need to get the analyzer report in this format. Then we can use it in products that support it - for example, on GitHub or in Visual Studio Code.
This format appeared because vendors of static analysis tools create their own output formats. However, even if the different analyzers' reports were presented in the same format (for example, JSON), the structure of the reports would differ. Therefore, one common standard was only a matter of time.
SARIF is developing rapidly, and it is becoming more popular. However, it has a small drawback. Sometimes it changes its structure, and you have to adjust the code a little so that the SARIF file passes validation. Nevertheless, these are small things compared to the benefits it brings. In theory, in an ideal world, it is enough to get a report in this format and then it can be opened in any program/system that works with static analysis results. Not bad, sounds great!
For GitHub to start analyzing SARIF files, you first need to set up a repository. When setting up, we used this instruction.
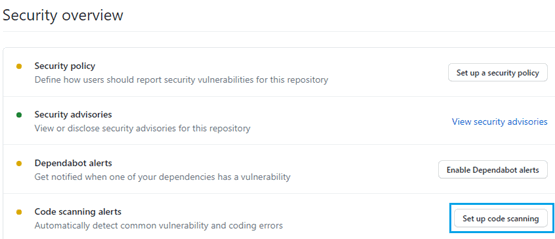
So, open your repository and click on "Security".
Find the "Code scanning alerts" in the center and click on "Set up code scanning" on the right.
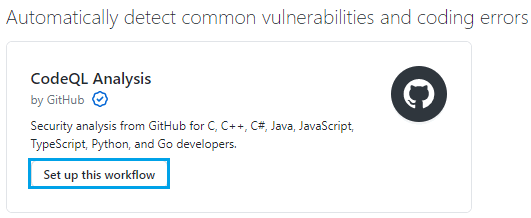
Next, click on "Set up this workflow".
Now give a name for the yml file (for example, upload-sarif.yml) and write the following content:
name: "Upload SARIF"

# Run workflow each time code is pushed to your repository and on a schedule.
# The scheduled workflow runs every at 00:00 on Sunday UTC time.
on:
  push:
  schedule:
  - cron: '0 0 * * 0'

jobs:
  build:
    runs-on: ubuntu-latest
    steps:
    # This step checks out a copy of your repository.
    - name: Checkout repository
      uses: actions/checkout@v2
    - name: Upload SARIF file
      uses: github/codeql-action/upload-sarif@v1
      with:
        # Path to SARIF file relative to the root of the repository
        sarif_file: results.sarif
It should look as follows:
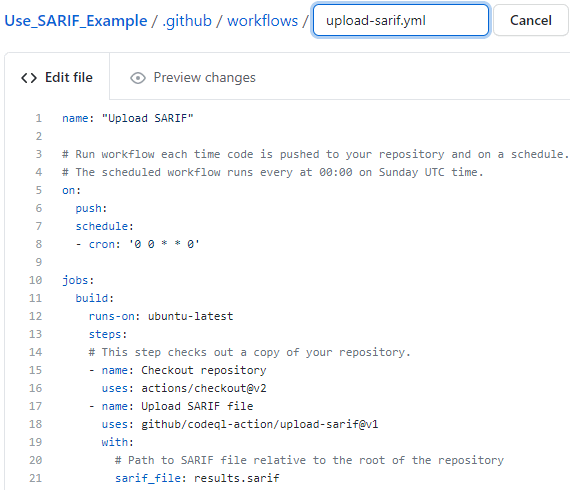
Now click on "Start commit", write a message (for example, "Create upload-sarif. yml") and make a commit.
Great, we've set up the repository! We can move on to getting the SARIF file.
As you might have guessed, SARIF is a unified standard, and you can get it using various static analyzers and tools. In this article, we will use PVS-Studio and PlogConverter. Keep reading to find out about all this.
To get the SARIF file, we first need to check the project using a static analyzer. Therefore, we added a small test C++ project with a single file in the repository configured above for demonstration. What we are going to actually check? :) Here is the content of the file:
#include <iostream>
void f(unsigned int ch)
{
  unsigned int chx = -1;
  if (ch >= 0x0fff0)
  {
    if ( !((ch >= 0x0FF10) && (ch <= 0x0FF19))
       || ((ch >= 0x0FF21) && (ch <= 0x0FF3A))
       || ((ch >= 0x0FF41) && (ch <= 0x0FF5A)))
    {
      ch = chx;
    }
  }
}
int main()
{
  std::cout << "error" << std::endl;
}
By the way, the synthetic example with an error has a real prototype, described in the article "How PVS-Studio proved to be more attentive than three and a half programmers".
As mentioned above, we'll check the project with the PVS-Studio static analyzer. Namely, using the "PVS-Studio_Cmd.exe" console utility. This utility allows you to analyze C++, C# MSBuild projects on Windows. By default, you can find it by path "C:\Program Files (x86)\PVS-Studio". You can read more about this utility here.
Don't worry if you don't have a license for the check. Click here and you'll get to the website. You'll be able to download it and get a trial license.
Fine, let's move on to the analysis. To make it, just run this command:
PVS-Studio_Cmd.exe -t "D:\Use_SARIF_Example\BestProjectCpp.sln" \
-o "D:\Use_SARIF_Example\results.plog" -e "D:\Use_SARIF_Example\"
Let's look at the command line in a little more detail. The "-t " flag is required. It allows you to specify an object to check (sln or a csproj/vcxproj file). The "-o " flag is responsible for the path to the file where the analysis results will be written. The "-e " flag is the root part of the path that PVS-Studio will use when generating relative paths in warnings. It is necessary because the report will be processed in the cloud.
Great, now you need to convert the plog file to a SARIF file. To do this, we'll use the PlogConverter utility.
We will perform the conversion using the PlogConverter utility, so let me say a few words about it. PlogConverter is an open source utility designed to convert PVS-Studio analyzer reports from one format to another. The utility is described in more detail in the documentation.
So, we need to find PlogConverter.exe on the computer. This utility is installed together with PVS-Studio and is located next to "PVS-Studio_Cmd.exe". Let's follow this path, open the console and write the following command:
PlogConverter.exe "D:\Use_SARIF_Example\results.plog" \
-o "D:\Use_SARIF_Example" -t sarif -n results
That's all. Now you can upload this file and view the analysis results.
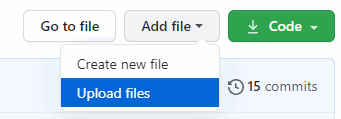
To check that everything we've done works correctly, we will quickly upload our SARIF file manually and see the analysis results. To do this, go to the repository and click on "Add file -> Upload files".
Next, add the SARIF file and wait for it to be processed. If you want to see the processing progress, click on "Actions" and select a working task.
When it's done, go to the "Security" tab. Select "Code scanning alerts -> PVS-Studio" on the left.
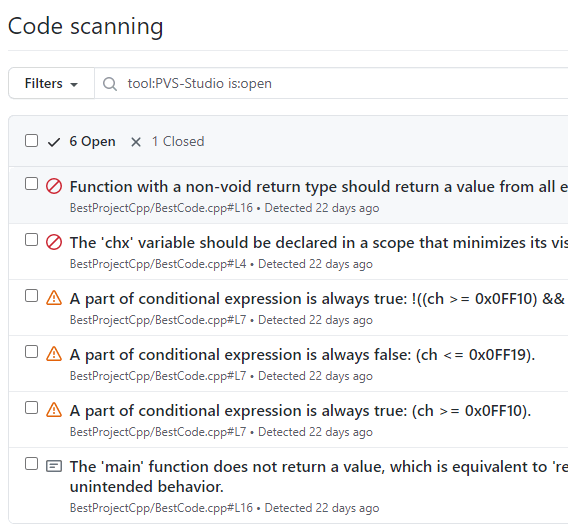
On the right, you will see the analyzer messages. Let's open a warning:
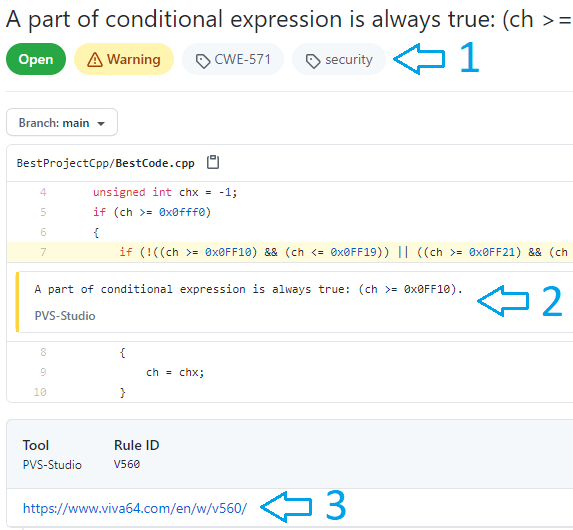
Here we see:
It's time to see how all this can work in practice. I suggest considering a scenario where a person downloads a repository, performs some work, creates a SARIF file using the commands above, and uploads changes to a separate branch. As a result, this scenario will allow us to see not only what files the user has changed, but also what mistakes are made. Therefore, let's download the repository and make changes to the file with the C++ code:
#include <iostream>
void f(unsigned int ch)
{
  unsigned int chx = -1;
  if (ch >= 0x0fff0)
  {
    if (!((ch >= 0x0FF10) && (ch <= 0x0FF19))
      || ((ch >= 0x0FF21) && (ch <= 0x0FF3A))
      || ((ch >= 0x0FF41) && (ch <= 0x0FF5A)))
    {
      ch = chx;
    }
  }
}

int ComputeProjectionMatrixFOV(float fov)
{
  float yScale = 1.0 / tan((3.141592538 / 180.0) * fov / 2);
  return yScale;
}

int main()
{
  std::cout << "error" << std::endl;
}
Next, we check the file, save the report. We also get the SARIF file and replace the one in the downloaded repository with this new SARIF file. Finally, we make a commit in a separate branch. That's it, the user has done their job. Now it's time to look at errors.
Go to the repository. Click on "Security" - > " Code scanning alerts "- > " PVS-Studio "and on the right select the desired branch in "Branch". Look at the result:
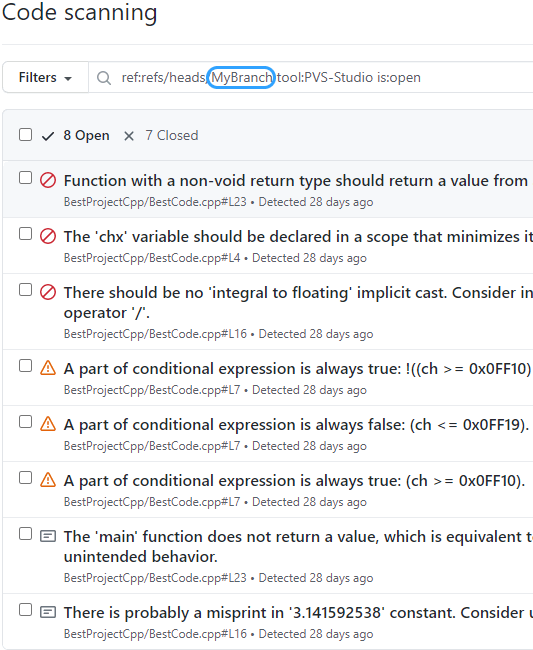
As you can see, error messages in the branch are saved separately. Agree, this is quite convenient. If you'd like, you can create a bat file that will run the analyzer, convert the report to SARIF, and replace the existing SARIF file.
So, you have the report, what's available for you? The first thing to note is that all errors are divided into two groups. These are "Open" and "Closed". "Open" are active errors that are not handled. "Closed" are errors that we have fixed or marked as false.

The second is the filters by error statuses (closed, open, and so on).
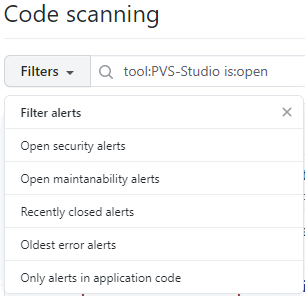
There are also filters on error characteristics. For example, you can sort by an error number.
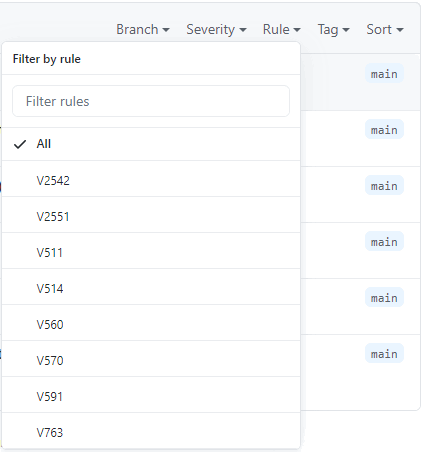
GitHub also allows us to mark messages as "false positive", "used in tests", and my favorite "won't fix":). To mark a message, select it (there is a checkbox to the left of the message) and click on "Dismiss" on the top right.
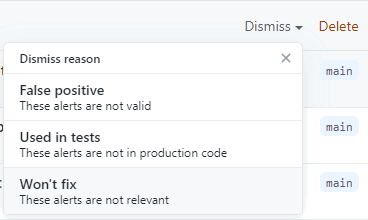
Messages that you mark up this way will not be included in the open errors column the next time you download the SARIF file.
If we need to return messages to "Open", we can do it easily. To do this, select "Closed", then select what we want to return, and click "Reopen" on the right.
Also note that if you upload a new log, it overwrites the current open errors. If the errors that were in "Open" are not found in the new log, then they fall into "Closed". Therefore, we recommend using SARIF only for analyzing the entire project. If you only need to analyze a pull request, then check out our articles on this topic. For example, this one. It will not be very convenient to use SARIF for pull request analysis.
Of course not, you don't depend on the language at all. All you need is a static analysis tool that can analyze your code and create a SARIF file. For example, the PVS-Studio analyzer used for this project can analyze C++, C#, and Java. So, let's try to check the code in C# again, because it's the best language in the world one of this article's authors likes it a lot. For example, we quickly do all the same things that were mentioned in the article, but for a C# project. Here is the content of the file that was analyzed:
using System;
using System.Collections.Generic;
using System.Linq;

namespace TestSarif
{
  class Program
  {
    static void Main()
    {
      var result = Formula42(3, 5);
    }

    static int Formula42(int? coefficientA, int? coefficientB)
    {
      var data = new List<int>();
      if (coefficientA != null)
        data.Add(Formula42(coefficientA.Value));
      else if (coefficientB != null)
        data.Add(Formula42(coefficientA.Value));
      return data.SingleOrDefault();
    }

    static private int Formula42(int coefficient)
    {
      return coefficient;
    }
  }
}
Here is the result:
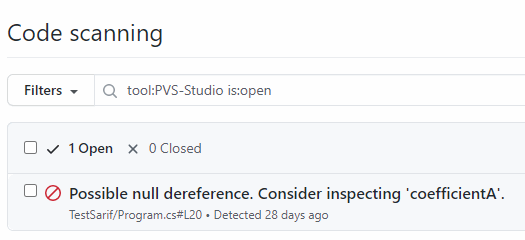
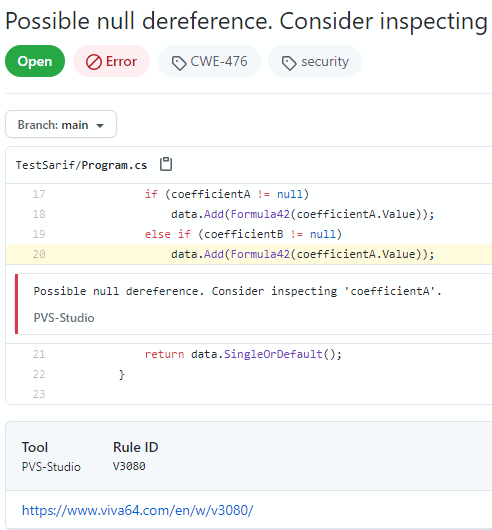
Well, let's look at the error itself.
To sum up, I would like to note that SARIF is a convenient format that allows you to view the analysis results. Besides, setting up is fast and easy. For example, in VS Code, you can do it in a couple of clicks. By the way, if you are interested in how to do this, then write about it in the comments. Anyway, if you have any suggestions on the topics of the article, don't hesitate to write us about them.
So, try and use it. Thanks for your attention!
0