Please note. A better way to work in Visual Studio Code is to use the PVS-Studio extension for Visual Studio Code instead of the Sarif plugin for Visual Studio Code described in this documentation.
You can view PVS-Studio reports in Visual Studio Code via the Sarif Viewer plugin. Below are instructions on how to install the plugin, upload the PVS-Studio report to it, and work with this report.
You can analyze the code and get the report in one of the following ways:
To install the 'Sarif Viewer' plugin, open Visual Studio Code, go to the 'Extensions' tab. In the search field, enter "Sarif Viewer" and click 'Install':
Note: the 'Sarif Viewer' plugin version 3.1.2 or higher is required for correct operation. If you can't find version 3.1.2 or higher in VS Code, you can find the desired version in the plugin repository on GitHub. Each version's sources have a file with the .vsix extension.
Install the plugin from the .vsix file: in the 'Extensions' tab, click on the three-dotted button. In the context menu, click 'Install from VSIX...':
In the opened window, select the .vsix file of the 'Sarif Viewer' plugin. After the plugin is installed, restart Visual Studio Code.
SARIF is a universal format for providing information from static analyzers. SARIF is used not only in PVS-Studio, but in other tools. For example, GitHub's Code scanning alerts, Coverity, and CodeSonar.
To convert reports, you can use command-line utilities like PlogConverter.exe for Windows and plog-converter for Linux/macOS. These utilities not only convert PVS-Studio's reports, but also process it — filter messages, for example.
The report format that should be used in Sarif Viewer is slightly different from the universal SARIF format. Therefore, when converting a report for VS Code, you should use a special SARIF format:
Below is an example of a command in PlogConverter.exe (Windows) to convert a PVS-Studio report to a SARIF format for Visual Studio Code:
PlogConverter.exe path\to\report.plog -t SarifVSCode ^
                                      -o output\directory ^
                                      -n converted_report_name
An example of a command in plog-converter (Linux/macOS) to convert a PVS-Studio report to a SARIF format for Visual Studio Code:
plog-converter path/to/report/file.json -t sarif-vscode \
                                        -o output/directory \
-n converted_report_nameNote. These utilities can convert a PVS-Studio report into a universal SARIF format. This format can be used in Sarif Viewer, but navigation through additional warning positions will not work.
If paths in the report start with the '|?|' mark, they need to be converted to absolute. Without this, the navigation through warnings won't work. Use the 'r' flag to replace the mark with the part of the path.
Example of a command to convert a report to SARIF format with the conversion of paths to absolute:
PlogConverter.exe path\to\report.plog -t SarifVSCode ^
                                      -o output\directory ^
                                      -n converted_report_name ^
-r path\to\project\folderTo open a report in a SARIF format, use menu items 'File > Open File':
You can also open the report from the file explorer. To do this, use the 'Open with Code' command from the context menu:
After the report is downloaded, a separate tab will open:
The plugin window has several tabs for grouping warnings:
On the top right, there are several elements in the tab added by the plugin:
A text filter allows filtering warnings from the report by any text that is displayed in the table with a list of warnings. For example, by the text of the warning message, as well as by the full or partial file name:
Click on the filter icon to open a menu with additional warning filters and checkboxes for hiding/displaying the 'BaseLine', 'Suppression', and 'Rule' columns:
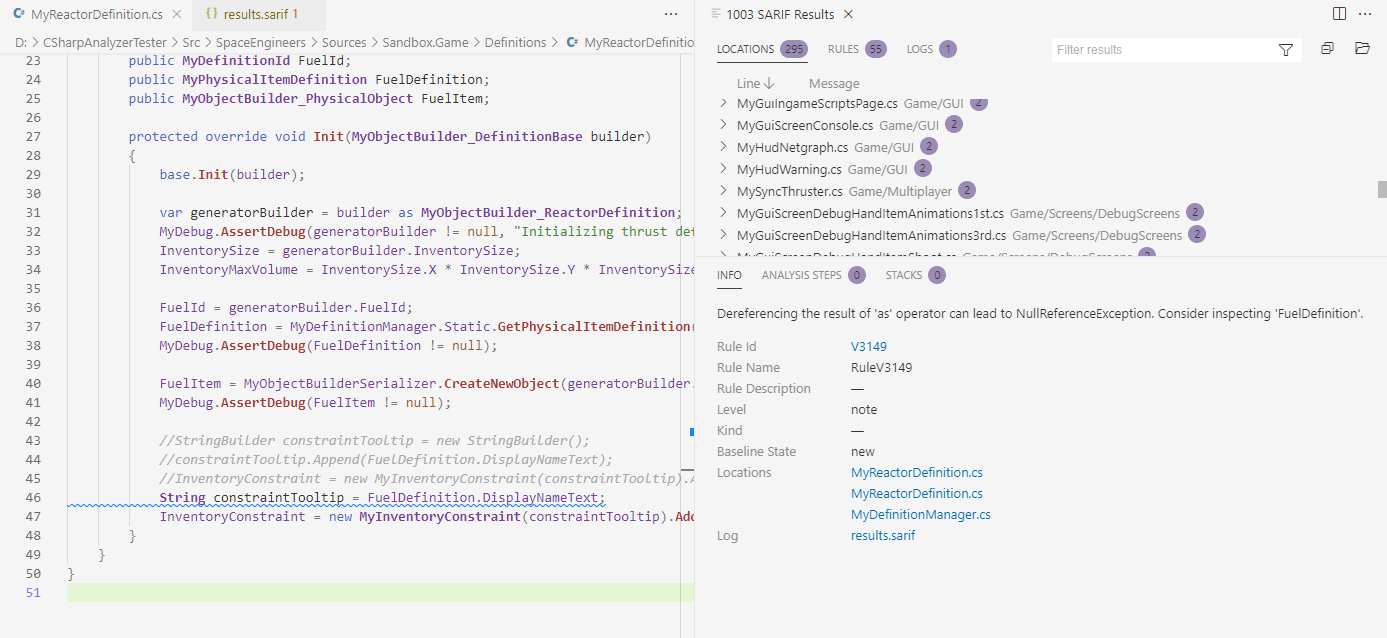
The 'INFO' tab displays information about the selected warning:
If you click on a warning, the corresponding file opens on the line to which it was issued. The string is underlined by a wavy line of one of the three colors. Each color indicates the warning's certainty level and corresponds to one of the levels in the additional filters:
One warning may relate to several positions in code. In this case, several lines will be displayed in the 'INFO' tab next to the Locations label:
Positions can point to lines in one or more files. This makes it easier to understand the warning. Click on the text with the description of the position to open the specified file on the line associated with the position.