
Our website uses cookies to enhance your browsing experience.
Webinar: Let's make a programming language. Lexer - 29.04

Go developers regularly deal with warnings from the built-in static analyzer. But what if you need more features or want to find something specific in your project? Go provides powerful tools for parsing and analyzing code. In this article, we'll talk about them and even create our first diagnostic rule.

We've got experience with Go tools for parsing code when we've started developing our own static analyzer in the Go language.
This article will be useful for beginners in development. So, let's start with the basics.
Static analysis is an analysis methodology that doesn't require code execution. Static analyzers can help detect errors early in development, and the list of things they can detect is practically endless: incorrect comparisons, unreachable code, potential panics, memory leaks, and much more.
The Go ecosystem has a built-in analyzer, go vet, and a collection of linters bundled in golangci-lint. These tools work quickly, connect easily to CI, and are familiar to every Go developer. Therefore, if you're not creating your product with its ecosystem (as we do), it would be better to integrate diagnostic rules or analyzers into your workflow.
If you think the capabilities of existing linters are insufficient (you need to check for project-specific errors, monitor internal contracts, or you're simply confident that you can create a better diagnostic rule than the existing one), in such cases, you can write your own analyzer. The standard library provides access to everything you need: syntax trees, type information, and file location. On top of that, there is a convenient go/analysis framework, creating full-featured linters without routine.
In this article, we'll show a step-by-step look at how analysis tools work in Go, which packages are used to work with code and semantics, how to run your own analyzer, and how to integrate it into the overall linter system.
Go provides a complete set of tools for parsing and analyzing source code. These packages are included in the standard library or located in the official golang.org/x/tools repository. Let's go through all the ones we need.
The go/ast package describes the structure of an abstract syntax tree (AST). It represents the structure of the program: expressions, operators, and declarations. It doesn't contain information about variable types where the object the identifier refers to—it only captures the syntactic form. This is one of the main packages you need to work with, since analyzers operate on AST nodes in one way or another.
The AST shows how the code is represented, but doesn't indicate what the identifier means. The go/types package does this. It enables you to:
ast.Ident;The main result of the work is the types.Info structure. It links AST nodes to types and objects. This package is needed when the information from the tree is insufficient to understand the error.
The go/token package helps process information about positions in a file: lines, columns, and shifts.
golang.org/x/tools/go/analysis is the official framework for creating diagnostic rules. It abstracts routine tasks, such as parsing, type checking, sharing data between analyzers, and report generation.
The analysis.Analyzer structure is a key element. It specifies:
Run function that performs the actual checks;The framework also provides supplementary packages:
analysis/singlechecker for running a single analyzer;analysis/multichecker for running multiple analyzers;analysis/passes/... for providing ready-made passes, for example, type checking and detecting the printf-like functions.The go/parser package can turns Go source code into the ast.File tree. It's needed when you manually create your analyzer. If you use the analysis framework, it parses itself.
The go/packages is used to load packages, an AST, and type data. It indicates how and which packages to load, such as modules, build tags, and the environment. It can load the entire set of packages with dependencies at once. The analysis framework already uses package loading mechanisms internally, so go/packages isn't usually required when writing diagnostic rules. But if you're writing your own tool, go/packages is almost always more convenient than a manual parser + types.
We won't use it in this article, but it is important to mention it. SSA (Static Single Assignment) is an intermediate representation similar to low-level pseudocode. SSA allows you to solve data-flow analysis problems, perform interprocedural checks, and build more complex diagnostic rules (for example, checking for possible nil dereferencing).
A typical analyzer uses the following combination:
go/ast) finds the required tree fragment;go/types) precisely defines what kind of variable or function it is;analysis combines everything into one diagnostic rule and integrates it into linters.Next, we'll take a closer look at how an analyzer actually works and how these packages interact with each other.
The go/analysis framework organizes diagnostic rule execution so that you don't have to manually load packages, parse files, build type information, or handle many other things. It does this automatically and passes a pre-prepared set of data into your diagnostic rule: AST, types, file, and location.
When an analyzer runs via singlechecker, multichecker, or, for example, as part of golangci-lint, the first step is:
go/types.The output forms a Pass structure, an object containing everything the diagnostic rule needs. We'll examine it in more detail in the section on the analysis framework.
Each analyzer describes its dependencies through the Requires field. For example, it can depend on nilness. The framework evaluates the correct execution order, runs dependencies, and passes their results to your diagnostic rule via pass.ResultOf.
The core of checks is located in Run(pass *analysis.Pass) (any, error).
Typically, the scenario for how a diagnostic rule works within a method looks like this:
1. Get a list of files:
for _, file := range pass.Files {
    // traverse the AST and search for the desired constructs
}
2. Use pass.TypesInfo to specify the type of variables, functions, and expressions.
3. If a problem is found, you need to call:
pass.Reportf(expr.Pos(), "message")The framework will collect the results, output them in the command line, or pass them on if the analyzer is running within other tools.
An abstract syntax tree (AST) is a structured program representation that shows what structures the code consists of: declarations, statements, expressions, and types. When working with an AST, the analyzer interprets the code not as text, but as a well-organized structure.
After parsing, the file is converted into a tree, where each node is a specific language element. For example:
ast.FuncDecl represents a function declaration;ast.AssignStmt represents an assignment statement;ast.CallExpr represents a function call;ast.BinaryExpr represents a binary expression;ast.Ident represents the name of a variable or function.The AST is always used because it's the foundation of all checks. If you need to find function calls, you look for ast.CallExpr nodes. If you need to check how a variable is used, you search for ast.Ident.
Let's take a look at a small code fragment:
x := a + bYou can use an auxiliary visualizer.
For this code snippet, the AST looks like this:
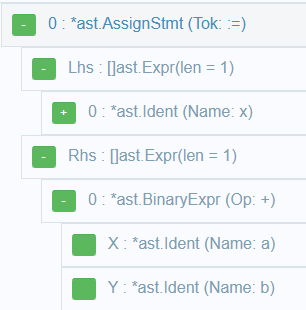
In the tree, pointers link these nodes, and the analyzer can freely move from one node to another. Since the AST uses structural type checking, so it's sufficient to check the node type:
if call, ok := n.(*ast.CallExpr); ok {
    // function call found
}
You can handle assignments, operations, conditions, and any other constructs in exactly the same way. For example, AssignStmt.Lhs and AssignStmt.Rhs contain the left and right sides of the statement.
Remember that the tree itself doesn't store data about variable types or constant values. We'll talk about it in the next section dedicated to go/types.
The go/types package lets the analyzer understand what type an expression has, where an identifier refers to, and whether operations are used correctly. It bridges the gap between the syntax tree and real program entities: variables, functions, types, and methods.
Let's say there is an expression in the code:
x := y + zThe AST will only say that this is a binary expression with the + operator, but it won't say what types y and z have, where the y variable is declared. That information comes from go/types. The result of go/types is types.Info.
Look at the most important fields:
Types stores the type of each expression;Defs shows where objects are defined;Uses shows where objects are used.Thus, any identifier can be expanded to a specific object (variable, function, or field) along with its type.
To find out the type of an expression, you can use the following code:
if tv, ok := pass.TypesInfo.Types[call]; ok {
    fmt.Printf("Expression type: %s\n", tv.Type.String())
}
The identifier contains only the name (x), but doesn't know what it's bound to. Semantics makes this connection:
obj := pass.TypesInfo.ObjectOf(ident)obj can be:
types.Var);types.Func);types.Const);types.TypeName);types.PkgName).The golang.org/x/tools/go/analysis framework is a fundamental part of the static analysis in Go. It eliminates routine and provides a convenient structure for writing your own diagnostic rules. With it, you can quickly create an analyzer, integrate it into other tools, and run it on real projects.
Each diagnostic rule is represented as an object of the analysis.Analyzer type. It describes everything you need:
Run function that contains the check;This transforms analyzer units of analysis that can be combined, merged into a single binary file, and connected to linters.
The simplest analyzer looks like this:
var Analyzer = &analysis.Analyzer{
    Name: "mycheck",
    Doc:  " Description of the rule",
    Run:  run,
}
Where run is a verification function:
func run(pass *analysis.Pass) (any, error) {
    // verification logic
    return nil, nil
}
The framework passes the analysis.Pass object into your diagnostic rule. It contains all the necessary information:
Files contains a list of AST files (ast.File) ready for traversal;TypesInfo contains a type information (types.Info) for expressions in the tree;Pkg contains a current package;Reportf and Report contain methods for outputting errors;Fset contains a position table (token.FileSet);ResultOf contains data from other analyzers if the diagnostic rule has dependencies.To report a problem, use the pass.Reportf method. For example:
pass.Reportf(call.Pos(), "Undesirable function call %s", funObj.Name())The framework provides two convenient packages, singlechecker and multichecker.
singlechecker is used when you have a single rule:
package main

import (
    "golang.org/x/tools/go/analysis/singlechecker"
)

func main() {
    singlechecker.Main(Analyzer)
}
After build, we can run:
go vet -vettool=./mycheck ./...multichecker is used when there are many rules. They can be combined into a single tool:
multichecker.Main(
    rule1.Analyzer,
    rule2.Analyzer,
    rule3.Analyzer,
)
The advantages of analysis are quite obvious:
go vet and golangci-lint;Your analyzer is valuable if it's easy to run. The Go ecosystem is designed so that any analysis tools can be seamlessly integrated into familiar workflows: run via go vet and used in CI. Let's see how that works.
go vet is a Go's built-in static analysis mechanism. It can load external analyzers when they're provided as a vettool.
To connect your analyzer, first build it:
go build -o mycheck ./cmd/mycheckNow you can run the analyzer:
go vet -vettool=./mycheck ./...Here's what you get:
mycheck will operate as a fully integrated part of go vet;This is a convenient way to distribute a simple set of rules.
The analyzer can also be integrated into golangci-lint. You can read more about this in the documentation and see an example.
If you've built the analyzer using singlechecker or multichecker, you can also run it directly:
./mycheck ./...
This option is used:
Let's look at the simplest example to see how a Go analyzer rule is written.
Diagnostic rule should find empty if blocks like that:
if cond {
}
The diagnostic rule uses the go/ast package to traverse the syntax tree.
Look at the code in the main.go file:
package main

import (
  "emptyif"

  "golang.org/x/tools/go/analysis/singlechecker"
)

func main() {
  singlechecker.Main(emptyif.Analyzer)
}
Now look at the code for the rule in the emptyif.go file:
package emptyif

import (
  "go/ast"

  "golang.org/x/tools/go/analysis"
)

var Analyzer = &analysis.Analyzer{
  Name: "emptyif",
  Doc:  "reports empty if statements",
  Run:  run,
}

func run(pass *analysis.Pass) (any, error) {

  for _, file := range pass.Files {
    ast.Inspect(file, func(n ast.Node) bool {
      if stmt, ok := n.(*ast.IfStmt); ok {
        // We check if there is a body and if it is empty
        if stmt.Body != nil && len(stmt.Body.List) == 0 {
          pass.Reportf(stmt.Pos(), "empty if block")
        }
      }
      return true
    })
  }

  return nil, nil
}
Let's explore what this diagnostic rule consists of:
ast.Inspect is used, allowing recursive inspection of tree nodes.IfStmt. The node is compared by type conversion: n.(*ast.IfStmt).stmt.Body.List contains a list of statements. If it is empty, the analyzer issue a warning.pass.Reportf outputs a message linked to the location in the source code.If everything is set up correctly, you can run your analyzer after building it:
go build -o emptyif.exe ./cmd/emptyif
go vet -vettool=D:\emptyif\emptyif.exe ./...
The output will look something like this:
tests\emptyif_test\file1.go:12:2: empty if blockThat's all for now. We've explored the basics of writing our own static analyzer in Go. If you find this article useful, we can do a deeper overview in the future, where we'll examine a real-world diagnostic rule, show how the testing stage proceeds, and so on.
By the way, I think you've already guessed that we're working on our own static analyzer for Go. If you want to join in the EAP, keep an eye on our news.
0
0
0

0